
English Русский
Български
Беларускі
Український
Српски
Hrvatski
Română
Polski
Slovenský
Magyar
| Articles | Contacts | Sitemap |   
Repair and maintenance Lada Repair and maintenance Mazda Repair and maintenance Mitsubishi Repair and maintenance Toyota Repair and maintenance Land Rover Repair and maintenance Hyundai Repair and maintenance Nissan
VAZbook.ru


Main     1111   2101   2105   2106   2107   2109   2110   2115   2121  
VAZ-2121 (1977-1994) VAZ-21213 (1994-2006) VAZ-21214 (1994-2006)
  • Main
  • «Niva»
  • VAZ-2121
  • General information
  • Car VAZ-21219
  • Adjusting and checking the carburetor

Adjusting and checking the carburetor (VAZ-2121)

            0

Contents: Setting the fuel level in the float…↓ Adjusting the starting device ↓ Adjusting engine idle speed ↓ Checking the operation of the second…↓

Setting the fuel level in the float chamber


The fuel level required for normal operation of the carburetor is ensured by the correct installation of serviceable elements of the shut-off device.

Check the correct installation of float 1 (Fig. 9-13) with gauge 4, for which install it perpendicular to cover 2, which you hold horizontally with the floats facing up. There should be a gap of no more than 1 mm between the gauge along the contour and the floats.
Fig. 9-13. Setting the fuel level in the float chamber of the carburetor 21073-1107010: 1 - float;…

Fig. 9-13. Setting the fuel level in the float chamber of the carburetor 21073-1107010: 1 - float; 2 - carburetor cover; 3 - sealing gasket; 4 - gauge for checking the position of floats; 5 - needle valve


If necessary, adjust by bending the tongue and float levers. The supporting surface of the tongue must be perpendicular to the axis of the needle valve 5 and must not have dents or nicks.

Adjusting the starting device


When turning lever 4 (see fig. 9-10) control the air damper 5 completely counterclockwise, the air damper should be completely closed under the action of spring 7. If the damper is not closed, eliminate the cause of jamming.


With the air damper fully closed, manually press the rod 3 of the starting device until it stops. In this case, the air damper 5 should open by 3.0 mm (starting gap B). If necessary, adjust the gap with screw 2.

Throttle valve 12 of the first chamber with the air damper fully closed should be slightly open by 1.1 mm (starting gap C) If necessary, adjust this gap with screw 10.

Adjusting engine idle speed


The adjustment is provided by the adjusting screw 2 (Fig. 9-14) of the mixture quality (composition) and the adjusting screw 1 of the mixture quantity. The adjusting screw 2 is closed by the plug 4. To access the screw, it is necessary to remove the plug with a corkscrew.
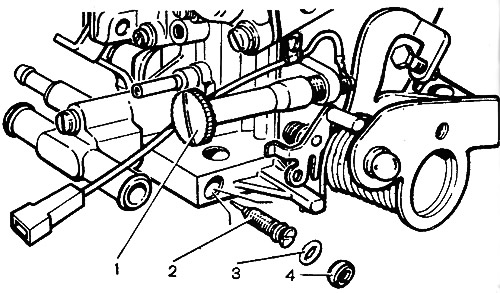
Fig. 9-14. Carburetor idle speed adjustment screws 21073-1107010: 1 - mixture quantity adjustment…

Fig. 9-14. Carburetor idle speed adjustment screws 21073-1107010: 1 - mixture quantity adjustment screw; 2 - adjusting screw for mixture quality (composition); 3 - sealing ring; 4 - adjusting screw plug.


Idle speed adjustment must be performed on a warm engine (coolant temperature 90-95°C), with adjusted valve timing clearances, with the ignition timing set correctly and with the air damper fully open.

Using the mixture quantity adjusting screw 1, set the engine crankshaft speed to 750-800 min⁻¹ on the stand tachometer.


Adjustment screw of 2 quality (composition) mixtures achieve a carbon monoxide (CO) content in the exhaust gases of no more than 3% at this position of screw 1 (the CO content is reduced to 20°C and 101.3 kPa (760 mm Hg.).

Using screw 1, restore the crankshaft speed to 750-800 min⁻¹.

If necessary, use adjusting screw 2 to restore the CO content to no more than 3%.

After completing the adjustment, sharply press the throttle pedal and release it, the engine should increase the crankshaft speed without interruption, and if it decreases, it should not stall. If the engine stops, use screw 1 to increase the crankshaft speed within 750-800 min⁻¹.

Install a new plastic plug 4 into the hole for the mixture quality adjusting screw 2.

Checking the operation of the second camera locking mechanism


Turn the air damper control lever counterclockwise from the heater until the damper is completely closed. Then turn the lever 19 (see fig. 9-12) control of the throttle valves until the valve 23 of the first chamber is fully opened, while the throttle valve 24 of the second chamber must remain in the closed position.

Turn the lever at the air damper control clockwise until it stops, and the lever 19 of the throttle valve control until the valves are fully open. If the throttle valve of the second chamber does not open, eliminate the malfunction. The cause may be the jamming of the lever 20 of the second chamber lock or the disconnection of the spring 21 of the lock lever.


This article is available at russian, bulgarian, belarusian, ukrainian, serbian, croatian, romanian, polish, slovak, hungarian
The text was reviewed by the specialist: Grigory Vologodtsev

Share with friends:

Previous articles
VAZ-2121: Car VAZ-21219
Next articles

Assembling the carburetor
Cleaning and checking the technical condition of carburetor parts
Disassembling the carburetor
Features of the carburetor device
Power supply system
Exhaust gas recirculation system
Features of the transmission of the VAZ-21219
Contactless ignition system
Carburetor electromagnetic valve control system

More articles from other manuals on VAZ cars:
➠ Adjusting and checking the carburetor after assembly VAZ-21011 (1974-1983)
➠ Carburetor Drive — Checking and Adjusting VAZ-2104 (1984-2012)
➠ Carburetor Drive — Checking and Adjusting VAZ-2106 (1976-2006)
➠ Carburetor Drive — Checking and Adjusting VAZ-2107 (1982-2012)
➠ Adjusting the carburetor and engine idle speed damper drives VAZ-1111 (1988-1996)
Link in different formats to this page


Visitor comments

No comments yet


How much will 12 + 25 ?


VAZ-2121 (1977-1994) 
  • General information
  • Vehicle device
  • Car VAZ-21219
  • Power unit
  • Engine repair
  • Cooling system
  • Lubrication system
  • Supply system
  • Transmission
  • Clutch
  • Car gearbox
  • Transfer case
  • Cardan gear
  • Rear axle and gearbox
  • Front axle
  • Chassis
  • Front suspension
  • Rear suspension
  • Steering
  • Brake system
  • Body
  • Exterior
  • Interior
  • Doors and windows
  • Electrical equipment
  • Equipment and devices
  • Headlights and lighting
  • Engine electrics


VAZ-21213 (1994-2006) 
  • General information
  • Vehicle device
  • User manual
  • Power unit
  • Engine repair
  • Cooling and lubrication system
  • Supply system
  • Transmission
  • Clutch
  • Car gearbox
  • Transfer case
  • Cardan gear
  • Rear axle and shafts
  • Front axle and wheel drive
  • Chassis
  • Wheel suspension
  • Steering
  • Brake system
  • Body
  • Exterior
  • Interior
  • Electrical equipment
  • Engine electrics
  • Equipment and devices


VAZ-21214 (1994-2006) 
  • General information
  • Vehicle information
  • Troubleshooting
  • Power unit
  • Engine repair
  • Cooling system
  • Fuel system (carburetor)
  • Fuel system (injector)
  • Ignition system
  • Control system
  • Exhaust system
  • Transmission
  • Clutch
  • Car gearbox
  • Transfer case
  • Cardan gear
  • Front axle
  • Rear axle
  • Chassis
  • Front suspension
  • Rear suspension
  • Steering
  • Brake system
  • Body
  • Exterior
  • Interior
  • Doors, covers and windows
  • Ventilation and heating
  • Electrical equipment
  • Equipment and devices
  • Headlights and lighting
  • Engine electrics
  • Electrical circuits


VAZbook.ru © 2017 · Mobile version · Contact with administration · Sitemap: EN BG BY UA RS HR RO PL SK HU · Site search · News and articles VAZ-1111 · VAZ-11113 · VAZ-2101 · VAZ-21011 · VAZ-2104 · VAZ-2105 · VAZ-21051 · VAZ-2106 · VAZ-21061 · VAZ-2107 · VAZ-21099 · VAZ-2109 · VAZ-2108 · VAZ-2110 · VAZ-2112 · VAZ-2114 · VAZ-2115 · VAZ-2121 · VAZ-21213 · VAZ-21214 ·
The site stores technical data using cookies to improve the service.