




Open large image in new tab »
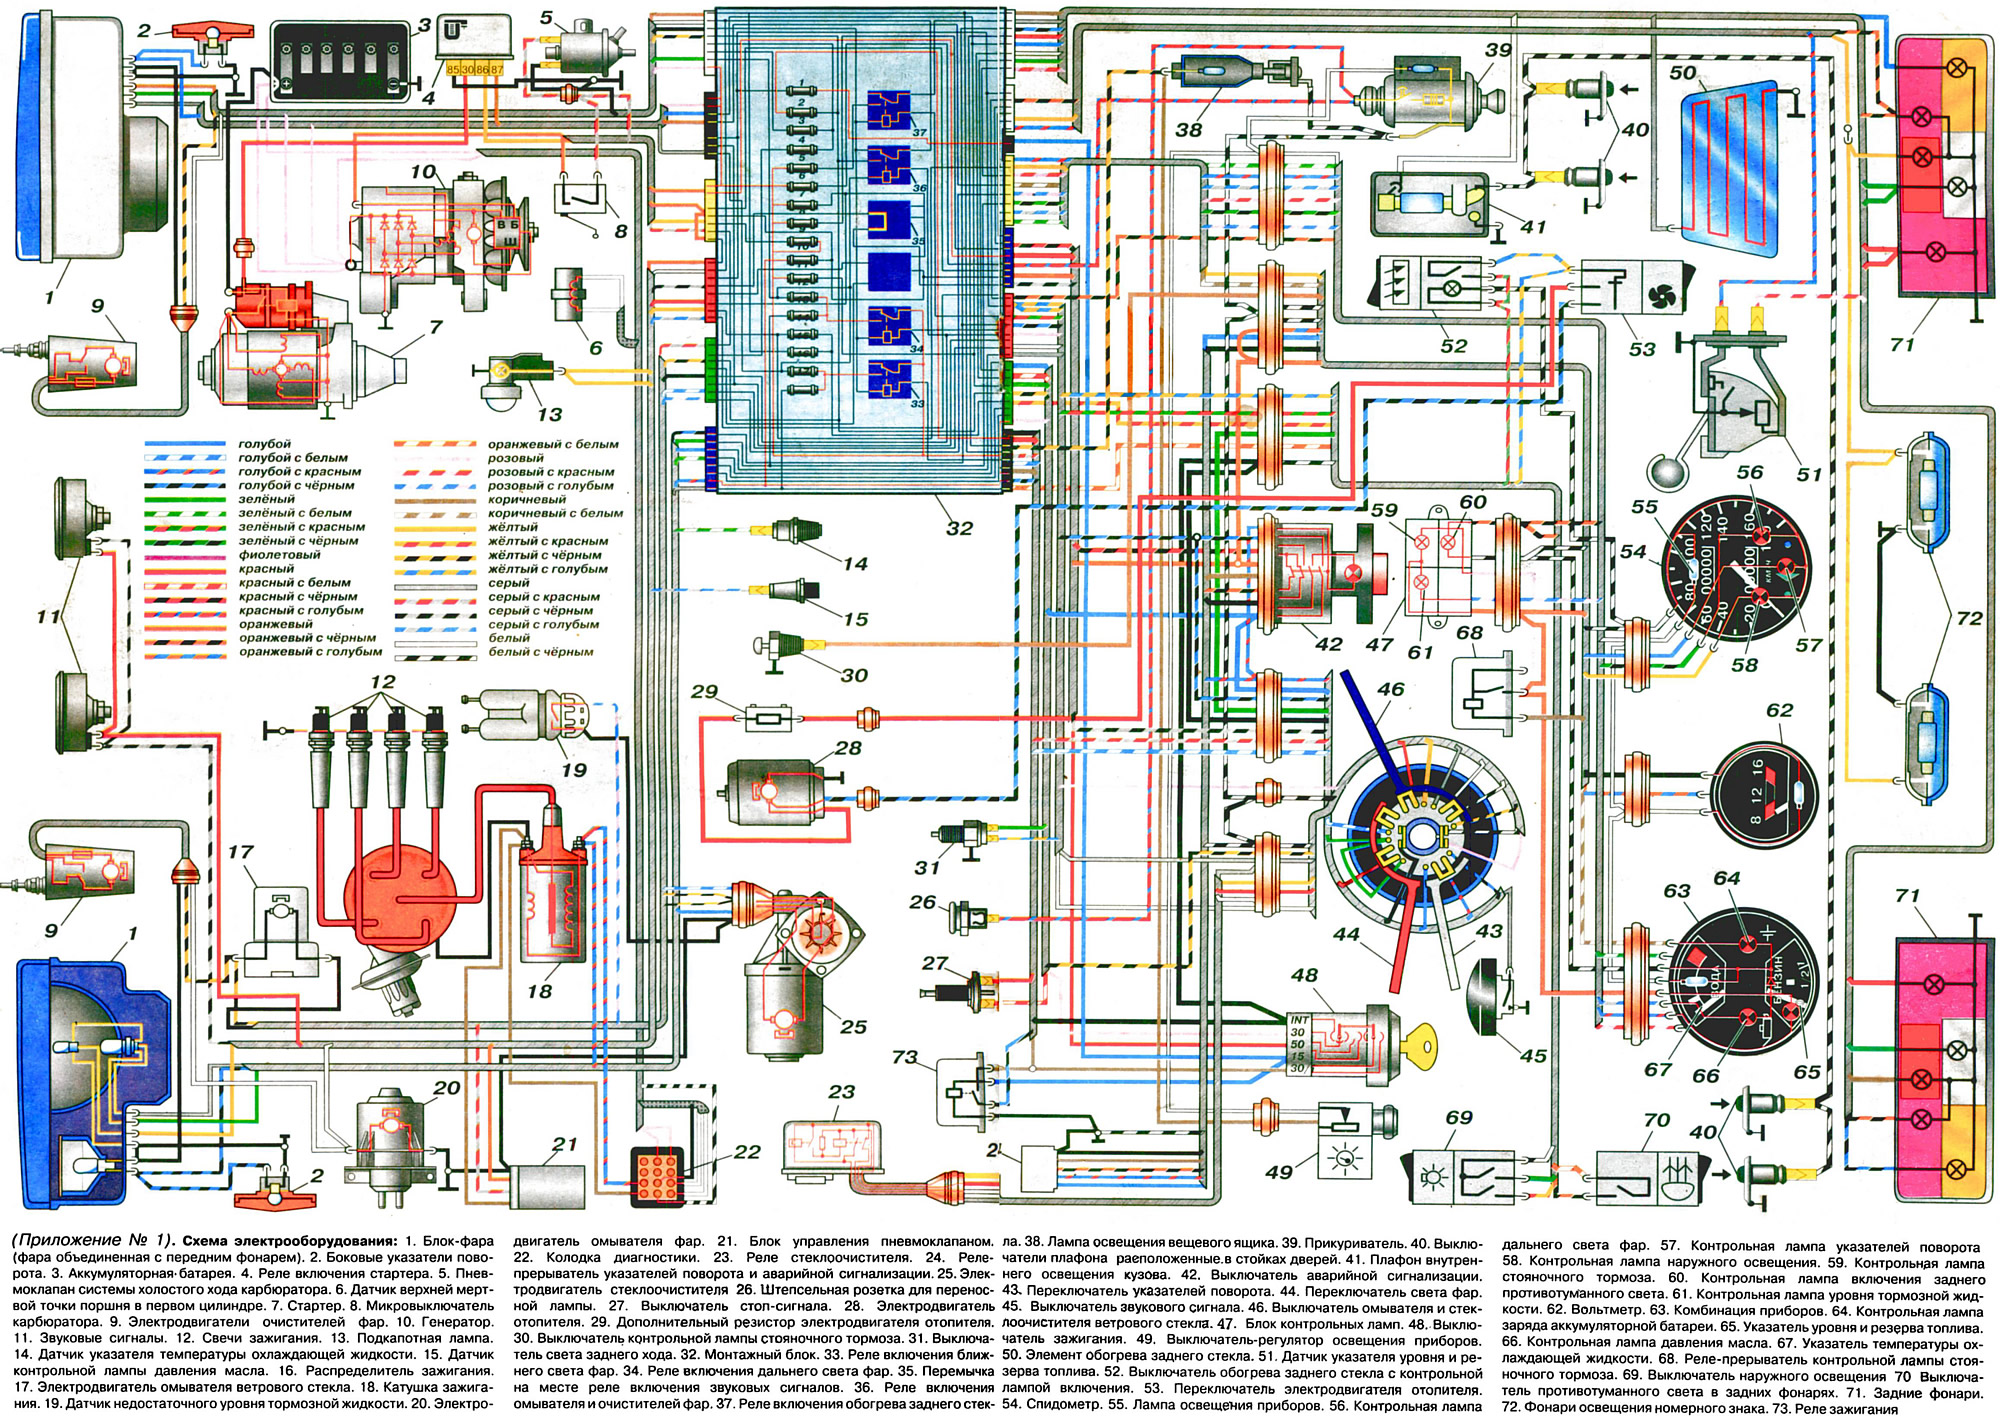
Appendix No.1. Electrical equipment diagram: 1. Headlight (headlight combined with front light). 2. Side direction indicators. 3. Storage battery. 4. Starter relay. 5. Carburetor idle speed control pneumatic valve. 6. Piston top dead center sensor in cylinder 1. 7. Starter. 8. Carburetor microswitch. 9. Headlight washers motors. 10. Generator. 11. Horns. 12. Spark plugs. 13. Underhood lamp. 14. Coolant temperature gauge sensor. 15. Oil pressure warning lamp sensor. 16. Ignition distributor. 17. Windshield washer motor. 18. Ignition coil. 19. Low brake fluid level sensor. 20. Headlight washer motor. 21. Pneumatic valve control unit. 22. Diagnostic connector. 23. Windscreen wiper relay. 24. Direction indicator and hazard warning flasher relay. 25. Windscreen wiper motor 26. Socket for portable lamp. 27. Brake light switch. 28. Heater motor. 29. Additional resistor of heater motor. 30. Parking brake indicator lamp switch. 31. Reversing light switch. 32. Mounting block. 33. Low beam headlight relay. 34. High beam headlight relay. 35. Jumper in place of horn relay. 36. Headlight washer and wiper relay. 37. Rear window heating relay. 38. Glove compartment light. 39. Cigarette lighter. 40. Dome light switches located in the door pillars. 41. Interior body light. 42. Hazard warning switch. 43. Direction indicator switch. 44. Headlight switch. 45. Horn switch. 46. Windscreen washer and wiper switch. 47. Indicator lamp unit. 48. Ignition switch. 49. Instrument lighting dimmer switch. 50. Rear window heating element. 51. Fuel level and reserve gauge sensor. 52. Rear window heating switch with on indicator lamp. 53. Heater motor switch. 54. Speedometer. 55. Instrument lighting lamp. 56. High beam indicator lamp. 57. Direction indicator lamp 58. Exterior lighting indicator lamp. 59. Parking brake indicator lamp. 60. Rear fog light indicator lamp. 61. Brake fluid level indicator lamp. 62. Voltmeter. 63. Instrument cluster. 64. Battery charge indicator lamp. 65. Fuel level and reserve gauge. 66. Oil pressure indicator lamp. 67. Coolant temperature gauge. 68. Parking brake indicator lamp flasher relay. 69. Exterior lighting switch 70 Tail fog light switch. 71. Tail lights. 72. License plate lights. 73. Ignition relay.
Open large image in new tab »
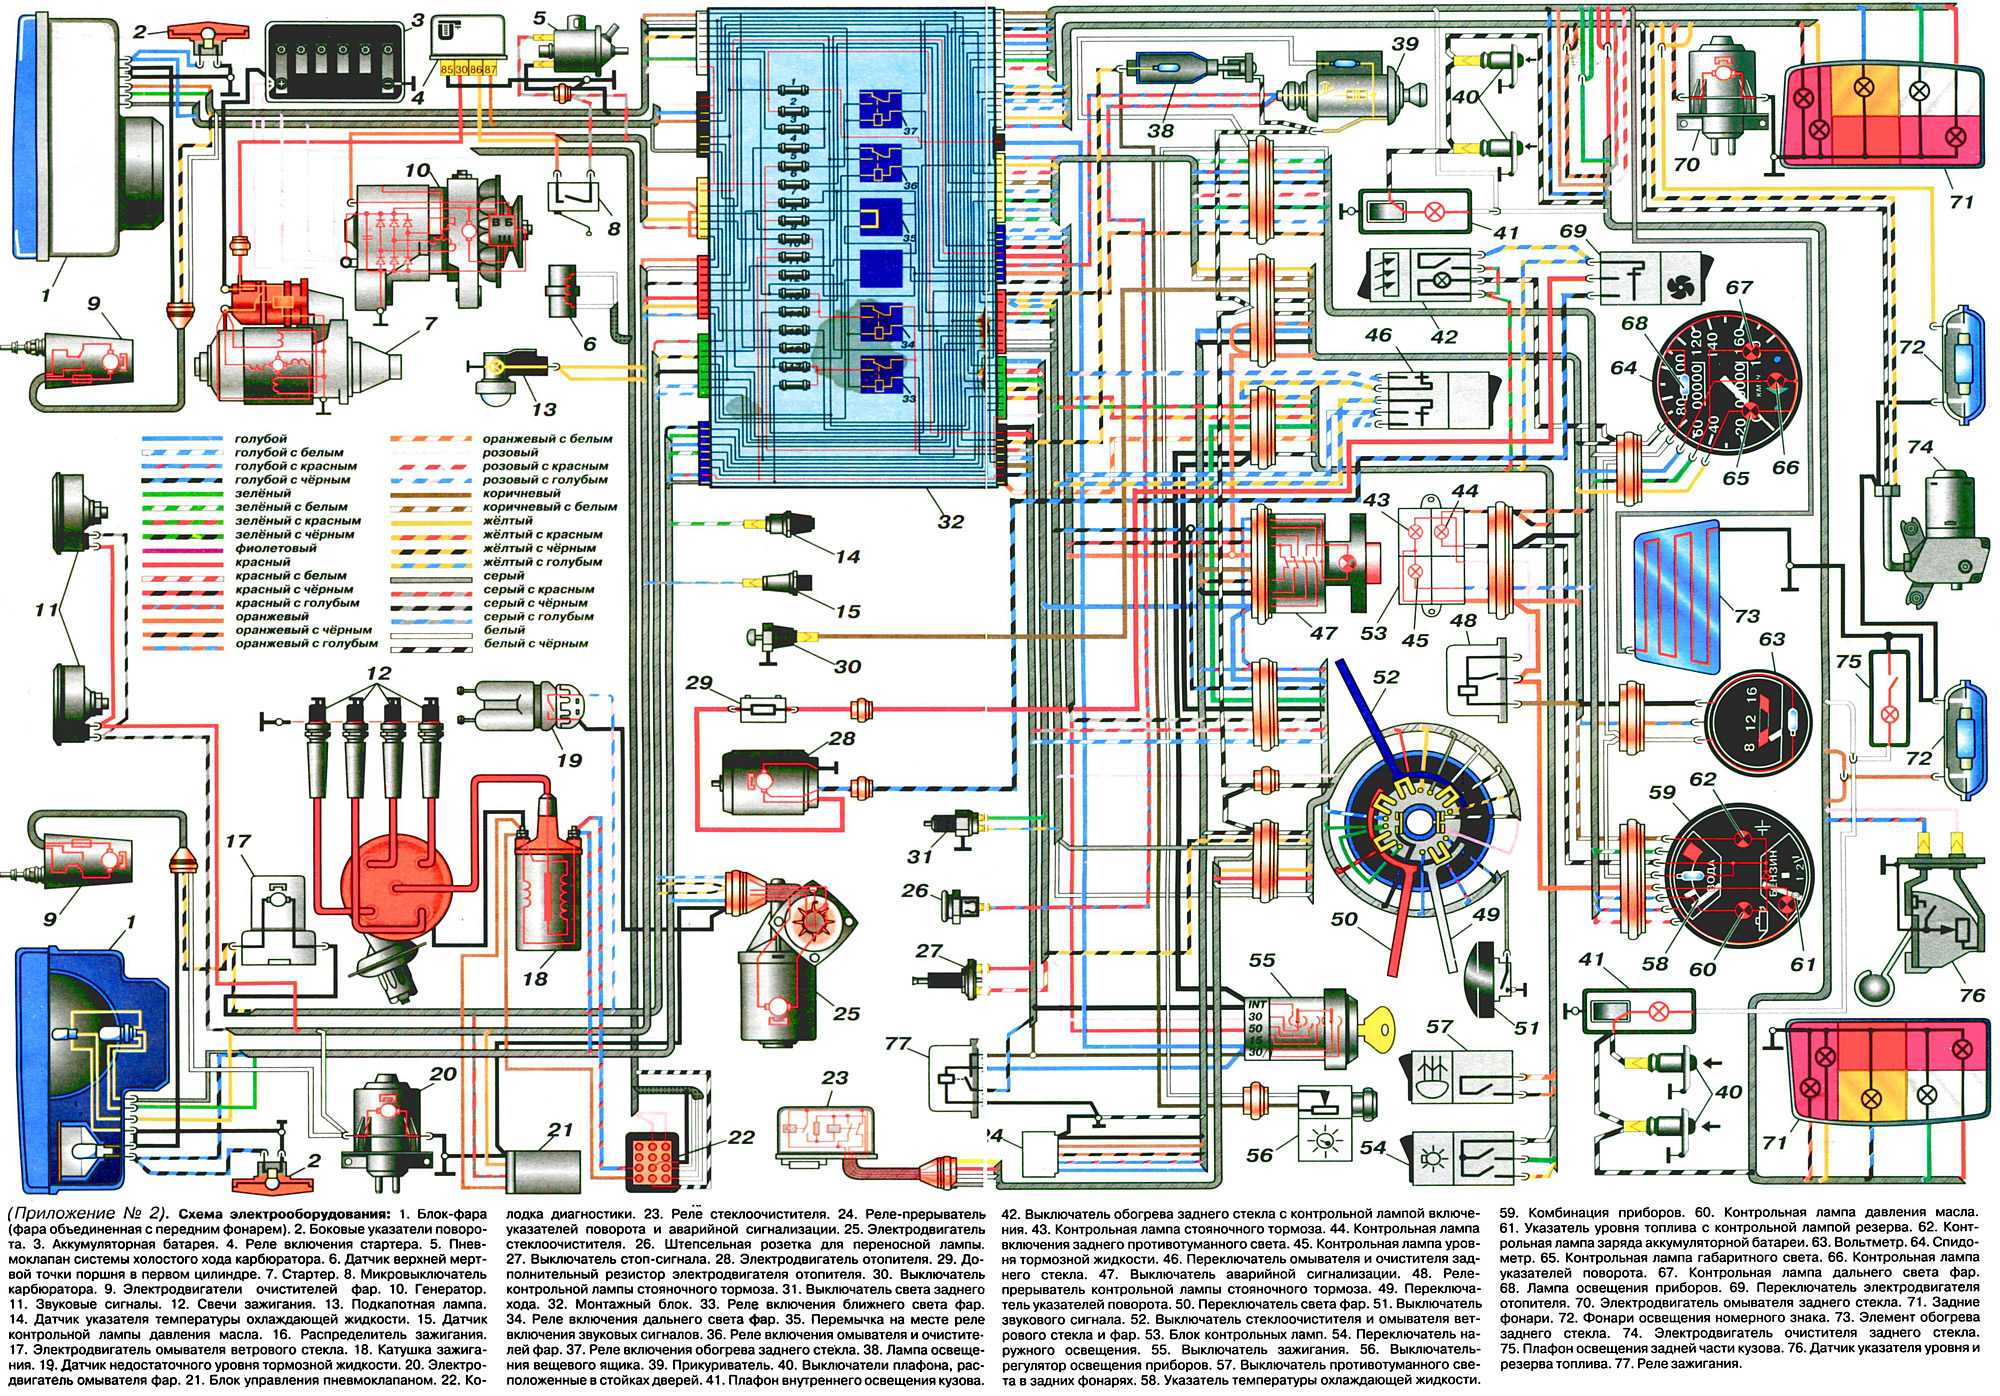
Appendix No.2. Electrical equipment diagram: 1. Headlight (headlight combined with front light). 2. Side direction indicators. 3. Battery. 4. Starter relay. 5. Carburetor idle speed control pneumatic valve. 6. Top dead center sensor of the piston in the first cylinder. 7. Starter. 8. Carburetor microswitch. 9. Headlight washers motors. 10. Generator. 11. Horns. 12. Spark plugs. 13. Underhood lamp. 14. Coolant temperature gauge sensor. 15. Oil pressure warning lamp sensor. 16. Ignition distributor. 17. Windshield washer motor. 18. Ignition coil. 19. Low brake fluid level sensor. 20. Headlight washer motor. 21. Pneumatic valve control unit. 22. Diagnostic connector. 23. Windshield wiper relay. 24. Direction indicator and hazard warning flasher relay. 25. Windscreen wiper motor. 26. Socket for portable lamp. 27. Brake light switch. 28. Heater motor. 29. Heater motor additional resistor. 30. Parking brake indicator lamp switch. 31. Reversing light switch. 32. Mounting block. 33. Low beam headlight relay. 34. High beam headlight relay. 35. Jumper in place of horn relay. 36. Headlight washer and wiper relay. 37. Rear window heating relay. 38. Glove compartment light. 39. Cigarette lighter. 40. Dome light switches located in the door pillars. 41. Body interior light. 42. Rear window heating switch with indicator lamp. 43. Parking brake indicator lamp. 44. Rear fog light indicator lamp. 45. Brake fluid level indicator lamp. 46. Rear window wiper and washer switch. 47. Hazard warning light switch. 48. Parking brake indicator lamp flasher relay. 49. Direction indicator switch. 50. Headlight dimmer switch. 51. Horn switch. 52. Windshield and headlight wiper and washer switch. 53. Indicator lamp unit. 54. Exterior lighting switch. 55. Ignition switch. 56. Instrument lighting dimmer switch. 57. Tail fog light switch. 58. Coolant temperature gauge. 59. Instrument cluster. 60. Oil pressure indicator lamp. 61. Fuel level gauge with reserve indicator lamp. 62. Battery charge indicator lamp. 63. Voltmeter. 64. Speedometer. 65. Side light indicator lamp. 66. Direction indicator lamp. 67. Headlight high beam indicator lamp. 68. Instrument lighting lamp. 69. Heater motor switch. 70. Rear window washer motor. 71. Tail lights. 72. License plate lights. 73. Rear window heating element. 74. Rear window wiper motor. 75. Rear body light. 76. Fuel level and reserve gauge sensor. 77. Ignition relay.
On VAZ-2105 and VAZ-2104 cars, a single-wire circuit for switching on electrical equipment devices is used, i.e. the second wire connecting consumers to power sources is the car's ground. This circuit allows reducing the number of wires and simplifying their installation.
The nominal voltage of power sources is 12 V. The negative terminals of power sources and consumers are connected to ground. This connection reduces the corrosion of metal body parts due to electrochemical corrosion.
All electrical equipment of cars can be divided into the following main systems:
- 1) a power supply system that includes a battery and a generator with a voltage regulator;
- 2) the engine starting system, which also includes the battery, then the starter and the corresponding ignition switch contacts;
- 3) the ignition system, consisting of the ignition coil, distributor and spark plugs, high-tension wires and the corresponding ignition switch contacts;
- 4) a lighting and light signaling system that combines headlights, lanterns and corresponding switches and relays;
- 5) control devices with sensors;
- 6) additional electrical equipment, which includes a windshield wiper and headlight washer, windshield and headlight washer, heater motor, cigarette lighter and sound signals.
The operation and activation of all systems are controlled by the corresponding switches, circuit breakers and relays.
The supply voltage to most consumers is supplied via the ignition switch. The circuits included in different key positions are shown in Table 1.
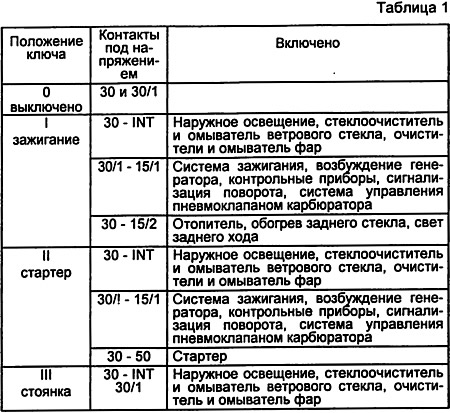
The table shows the contact closure for the ignition switch used before 1986. Since 1986, a contact section has been installed that, instead of contacts "15/1" and "15/2", has one common contact "15" that closes with contact "30/1", and there is no contact "P". Voltage from the battery is supplied to contacts "30" and "30/1".
Operation of some electrical equipment units may be required at any time, including when the vehicle is parked and the ignition is off. Such units include the sound signals and brake light lamps in the rear lights, the plug socket 26 for the portable lamp, the interior light 41, and the power supply circuit for the direction indicators in the hazard warning mode. The power supply circuits of these units are connected directly to the generator-battery line and can be switched on regardless of the position of the key in the ignition switch.
When operating a vehicle, accidental short circuits may occur both in the wires and in the electrical equipment units themselves. They cause a sharp increase in current in the short-circuited section of the circuit and, if protective measures are not taken, can lead to a rapid discharge of the battery, overheating of the wires, melting of their insulation and ignition of the car interior upholstery.
The power supply circuits of most electrical equipment units on VAZ-2105 and VAZ-2104 vehicles are protected by fuses located in mounting block 32. It contains seventeen fuses, but two of them are spare.
[The original source is published on the website: VAZbook.ru]
the fuse is a thin plate of low-melting metal, fixed to a plastic base.
Fifteen fuses (black color) are designed for a maximum current of 8 A, and two (M5 and X7 - green) - for 16 A.
Before replacing a blown fuse, it is recommended to inspect the circuits it protects to eliminate the fault that caused it to blow. Do not install homemade or any other fuses not provided for by the vehicle design.
The greatest number of fuses are installed in the lighting system, since it has the most extensive and extended network of wires and is therefore most susceptible to damage and short circuits with the "ground". A cross-circuit scheme is adopted to protect the lights, i.e. fuse 14 protects the side light bulbs in the left headlight and the right rear light, and fuse 15 protects the side light bulbs in the right headlight and the left rear light.
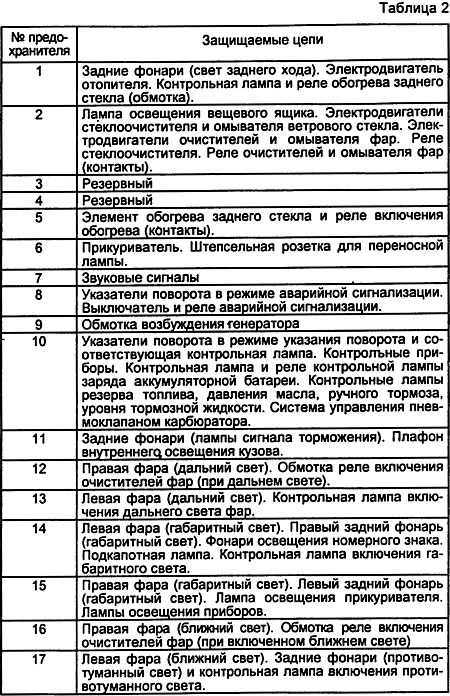
Table 2 lists the purposes protected by the fuses. Since 1988, the rear fog lamps are not protected by fuse N17, but by a separate fuse located in the wires next to the fog lamp switch. Also since 1988, the glove compartment lamp is not protected by fuse N₂, but by fuse N15.
Some electrical systems that require operation in emergency situations are not protected by fuses. Thus, the engine ignition system is not protected by fuses, so as not to introduce an extra element into it that would reduce the reliability of the system in operation. The engine starting circuit is also not protected, so as not to reduce the reliability of starting. In addition, the battery charging circuit is not protected by fuses, since the generator is connected to the battery by a short wire and introducing a fuse would complicate the circuit. Also, the windings of the relay for switching on the low and high beam headlights are not protected by fuses.
Headlight washer motors are additionally protected either by a fuse located in the power supply wire to the motor, or by a bimetallic fuse located in the motor itself.
For ease of servicing the vehicle, in addition to fuses, auxiliary relays are also located in the mounting block, which include headlights, headlight wipers and washers, and rear window heating. Jumper 35 is installed instead of the horn relay, since an auxiliary relay is not required to turn on the horn of VAZ-2105 and VAZ-2104 vehicles.
The mounting block is located in the right rear part of the engine compartment and through it the electrical connection of the electrical equipment units located in the engine compartment with the electrical equipment units of the passenger compartment and the rear part of the body is made. Electrical connections inside the mounting block are provided by a block of printed circuit boards. The mounting block is covered from above with a transparent plastic cover, on which opposite each fuse and relay there is a conventional sign - a symbol showing which electrical equipment units are protected or included by a given fuse or relay.
The cars may be equipped with mounting blocks of domestic production or manufactured in Slovenia. The latter are non-separable and cannot be repaired. In case of damage to internal connections, they must be replaced with new ones. Domestic mounting blocks can be disassembled and their printed circuit boards can be replaced. Soldering wires to replace burnt-out current-carrying tracks on printed circuit boards is allowed, unless this requires disconnecting the printed circuit boards.
When checking the serviceability of the vehicle's electrical circuit, it is not allowed to short-circuit the wires to ground, as this may lead to burnout of the current-carrying tracks of the mounting block.
When repairing a vehicle and its electrical system, it is essential to disconnect the wire from the negative terminal of the battery.
The wires that carry current from power sources to consumers operate in difficult conditions on a car. They are exposed to vibrations and large temperature differences. They can come into contact with gasoline and oil. Therefore, flexible low-voltage wires of the PVA type are used on VAZ-2105 and VAZ-2104 cars. These wires have elastic polyvinyl chloride insulation that is resistant to oil, gasoline and can operate in the temperature range from -40 to +105°C. The flexibility of the wires is ensured by making the conductive core from a large number of soft copper wires (from 19 for a wire with a cross-section of 1 mm to 84 for a wire with a cross-section of 16 mm²).
To make it easier to find wires in bundles, their insulation is painted in different colors: white, blue, yellow, green, brown, red, orange, pink, gray, purple and black. In addition, longitudinal or spiral stripes of white, red or black colors can be applied to the surface of the insulation.
When current passes through wires, the voltage drops and the wires heat up. To ensure that heating and voltage drops do not exceed permissible limits, it is necessary to select the appropriate cross-section of the current-carrying wire cores. The greater the electric current, the larger the cross-section of the wire core should be. Therefore, wires with different core cross-sections are used in cars: 16; 6; 4; 2,5; 1 and 0.75 mm².
The thickest wires with a cross-section of 16 mm connect the battery and the engine to the "ground", as well as the starter with the battery. The current of the greatest strength flows through these wires when the engine is started by the starter. The wire that connects the engine to the "ground" has one end welded to the body, and the other is fastened with a bolt to the clutch housing. The end of the wire connecting the battery to the ground is fastened with a bolt to the reinforcement of the upper cross member of the radiator frame, and the bolt is screwed into a nut welded to the reinforcement.
The battery and the generator are connected by a 6 mm² wire, since a fairly significant current also flows through this wire when charging the battery, as well as when the engine is not running, when all consumers are powered by the battery. A 6 mm² wire also connects the generator to the black terminal block. The current that powers most of the consumers flows through this wire. Wires with 4, 2, 5 and 1.5 mm² cross-sections are listed in Table 3.
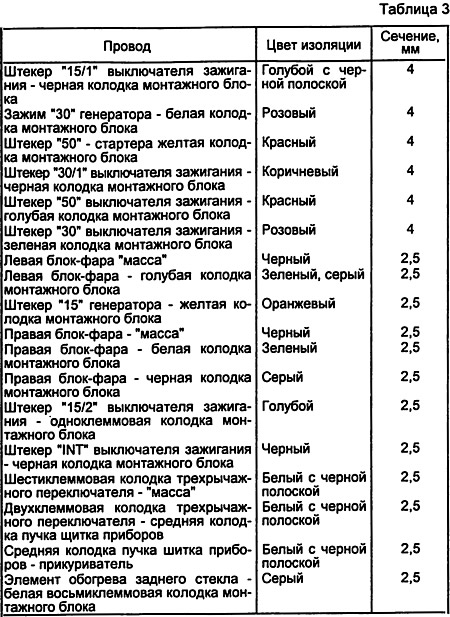
The remaining wires, not listed in the table, carry a relatively small electric current, and they have a core cross-section of 0.75-1 mm.
The wires are connected to the electrical equipment units and are connected to each other using convenient quick-release plug connections. The exception is the connection of wires to the battery, to the generator "30" bolt, to the starter power bolt and to the low-voltage terminals of the ignition coil. In these critical connections, the wire tips are clamped with nuts to ensure maximum reliability of the connections.
To protect electrical connections from water and dirt, protective rubber caps are used to cover the high-voltage wire tips, coolant temperature gauge and oil pressure indicator sensors, as well as the "+" terminal of the battery and the "30" terminal of the generator. The rear part of the side turn signals, which is located under the front fenders and is constantly exposed to dust and dirt, is also covered with a rubber cap.
To facilitate installation, all wires are bundled.
The wires in the bundles are wrapped with adhesive tape or enclosed in plastic tubes. The bundles are connected to each other and to many electrical equipment units using multi-terminal plug connectors, which reduces the possibility of wires being mixed up during installation. The plastic blocks of the plug connectors are equipped with spring latches that prevent accidental disconnection of the wires due to vibration. There are a total of six bundles of wires. Three of them are in the engine compartment and three in the car's interior.
In the engine compartment there are the left and right mudguard wire bundles and the battery wire bundle. The left mudguard wire bundle is routed along the front shield to the left mudguard, and the right mudguard wire bundle is routed along the right mudguard. The wire bundles are attached to the mudguards with plastic clamps, and to the front shield - with steel brackets welded to the body. The bundles should be fastened in such a way that they are not too taut, but also do not dangle, as this can lead to the wires fraying during shaking and shorting them to ground.
There are also three bundles of wires in the car's interior: the instrument panel wire bundle, the instrument panel wire bundle, and the rear wire bundle.
The instrument panel wire harness is laid under the instrument panel and has branches to switches, instruments and other electrical equipment units. It is attached to the front cross member with plastic ties and clamps and additionally to the heater air intake box with adhesive tape. The tip of the two wires (black and white with black stripe), coming from the bundle to the "ground", is secured to the mounting bolt of the turn signal and hazard warning light relay-interrupter.
The rear wiring harness runs from the mounting block down and then back along the right side of the body floor. Near the rear door pillar, it branches up to the interior light.
Along the crossbar of the body floor in front of the rear seat there is a branch to the ceiling light switches installed on the left door pillars. In the area of the rear window shelf there is a branch to the rear window heating element and to the fuel level and reserve indicator sensor. In addition, in this place there is another branch to the license plate lights installed on the trunk lid. This branch runs near the right hinge of the trunk lid, and then along the right side of the lid to the lights.
The rear bunch wires are attached to the body with steel clamps, adhesive tape and plastic ties. The wire tips (black) connecting the lamps and lights to the "ground" are attached to the body with self-tapping screws. Wire tips; connecting the fuel level indicator and reserve sensor to the ground, are attached under the bolts securing the sensor and the right rear light.
Over the years of car production, changes were made to the circuit, aimed at increasing the reliability of individual units or related to circuit simplification. Thus, in 1985, the voltage control in the on-board network using a control lamp was excluded, since a voltmeter was quite sufficient for this purpose. In 1986, a starter relay and an ignition relay were introduced. At the same time, a more reliable ignition switch began to be used. In 1988, a contactless ignition system and a more powerful generator of the 37.3701 type began to be installed on some cars.
Features of the electrical equipment diagram of VAZ-2104 cars
The electrical circuits of the front part of the VAZ 2105 and VAZ-2104 cars are the same. Due to the different shape of the rear part of the body on the VAZ-2104 cars, only the rear wiring harness and the instrument panel wiring harness have been changed a little.
Instead of one interior light located on the roof, two lights 41 are installed on the door pillars and one more light 75 for lighting the rear part of the interior. The rear lights 71 are of a different design. A rear window wiper and washer and a corresponding switch on the instrument panel are added.
Just like on the VAZ-2105, the rear bundle of wires first runs along the right side of the body floor and has a branch in the right lamp 41. Then behind the rear crossbar of the body floor it divides into two branches: one to the left and rear lamps, the left rear light 71 and to the fuel level and reserve indicator sensor, and the other to the rear window washer pump and the right rear light. From the right rear light, the bundle goes up along the rear pillar of the body and then along the right hinge of the rear door to the electrical equipment units installed on the rear door. These are the rear window wiper, license plate lights and rear window heating.
The power supply circuits for the rear window wiper and washer are protected by fuse N1 of the mounting block, and the power supply circuit for the ceiling light 75 is protected by fuse N11.