




Contents: Battery ↓ Generator ↓
Open large image in new tab »
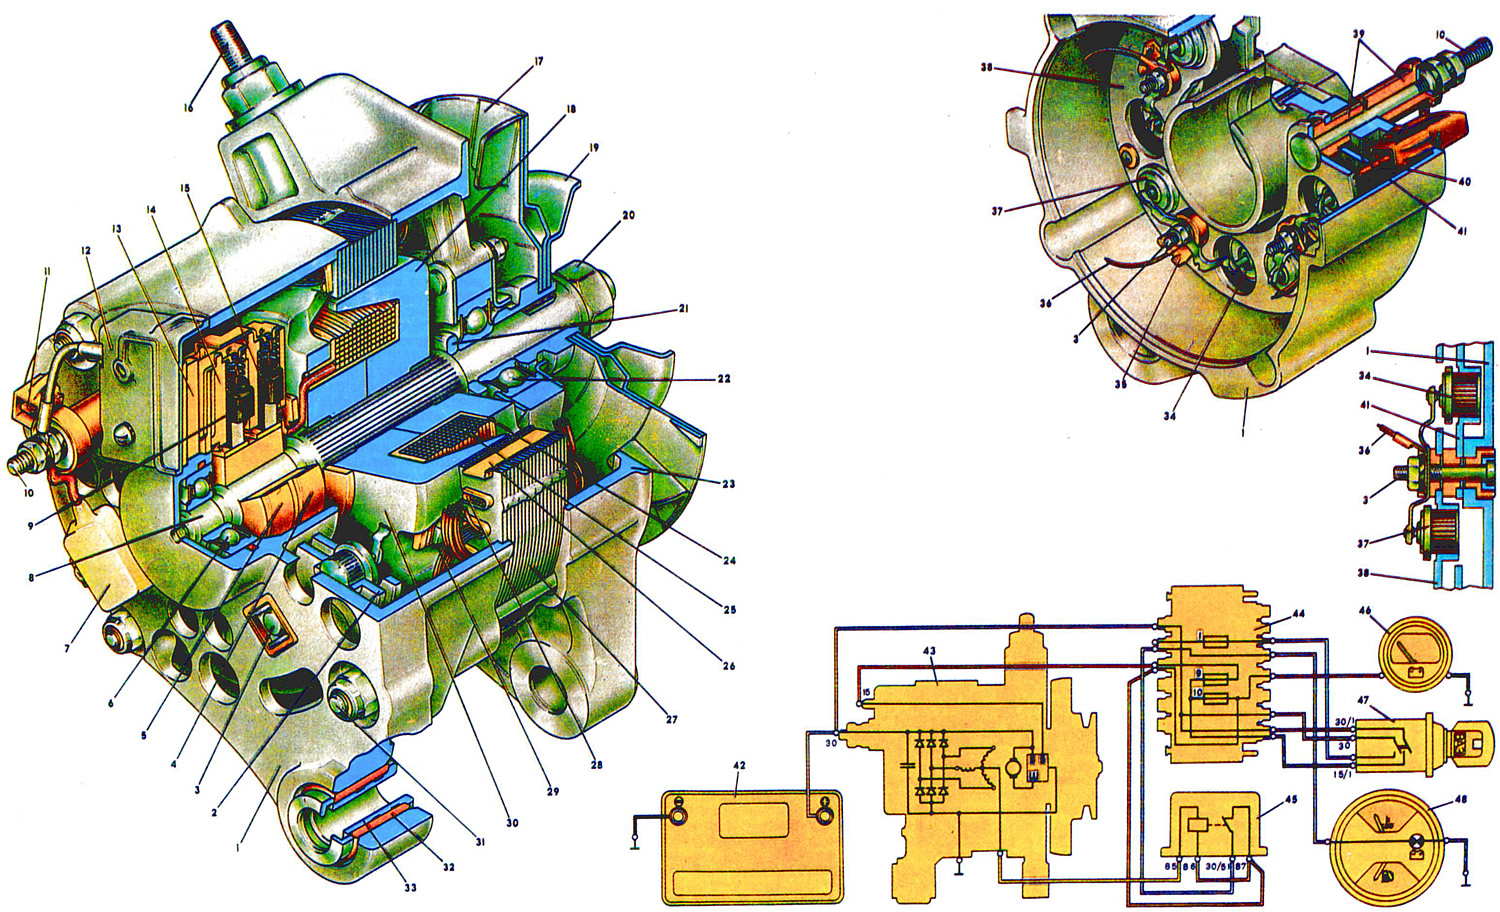
Fig. 29: 1. Generator cover on the side of the contact rings 2. The rectifier unit. 3. Bolt for fixing the rectifier unit and phase leads of the stator winding. 4,5. Contact rings. 6. Rear ball bearing of the rotor shaft. 7. A capacitor to reduce the level of radio interference. 8. The rotor shaft. 9. A brush connected to the output "W" of the voltage regulator. 10. Positive terminal bolt (pin "30"). 11. Plug of the central output of the stator winding. 12. Cover of the voltage regulator and brush holder. 13. Voltage regulator. 14. Brush holder. 15. A brush connected to the output "B" of the voltage regulator. 16. Pin for fixing the tensioner bar. 17. Pulley impeller. 18. front beak-shaped pole tip of the rotor. 19. Generator drive pulley. 20. Pulley mounting nut. 21. Remote ring. 22. Front ball bearing of the rotor shaft. 23. Generator cover on the drive side. 24. Frame of the rotor winding. 25. Rotor winding. 26. Insulation of the stator slot. 27. Stator. 28. A wedge of stator wires. 29. Stator winding. 30. Rear beak-shaped pole tip of the rotor. 31. Generator tie bolt. 32. Buffer sleeve. 33. Bushing. 34. A rectifier diode with reverse polarity ("negative"). 35. Insulating plate. 6. Phase output of the stator winding. 37. A rectifier diode with normal polarity ("positive"). 38. Positive diode holder. 39. Insulation bushings. 40. Wire of the central output of the stator winding. 41. Negative diode holder. 42. Rechargeable battery. 43. generator. 44. Mounting block. 45. Battery charge indicator lamp relay. 46. Voltmeter. 47. Ignition switch. 48. Instrument cluster with battery charge indicator light.
Battery
Technical specifications:
- Nominal voltage, V — 12
- Nominal capacity at 20-hour discharge mode and electrolyte temperature of 25°C at the beginning of discharge, A h — 55
- Weight (with electrolyte), kg - 21
On VAZ-2105 and VAZ-2104 cars, an acid battery 6ST-55 is installed, which serves to supply the car's consumers with electric current when the engine is not running, as well as to start the engine.
The battery consists of six 2 V cells connected in series. Each cell is placed in a separate section of the case and consists of positive and negative plates separated by plastic microporous separators. Electrolyte consisting of a solution of sulfuric acid in distilled water is poured into the sections.
The normal electrolyte level in the cells should be 5-10 mm above the safety shield or the upper edge of the separators. If the filler hole has a deep neck, then the electrolyte level should reach its lower edge. In this case, the meniscus in the lower opening of the neck is clearly visible. The density of the electrolyte of a fully charged battery at 25°C should be 1.28 g / cm for a moderate climate and 1.22 g / cm for a tropical climate.
Cars can be equipped with batteries manufactured at different factories (including imported ones), therefore, they may have various design differences, mainly related to the body design, but their characteristics are the same.
Generator
Technical specifications:
- Nominal voltage, V — 12
- Maximum recoil current (at 13 V and rotor speed of 5000 min), A - 45
- Adjustable voltage limits, V — 14.1±0.5
- Direction of rotation - right
- Maximum anchor rotation frequency, min — 13000
- Engine-generator gear ratio: 1:2.04
- Generator weight without pulley, kg — 4.2
The VAZ-2105 and VAZ-2104 cars are equipped with an alternating current generator of the G-222 type. It serves to supply the car's consumers with electric current and to charge the battery.
Since 1988, the 37.3701 generator has been used (from cars VAZ-2108). Its design is the same as that of the G-222 generator, and it differs only in the rotor and stator winding data, voltage regulator and rectifier unit, in which three additional diodes are installed to supply the rotor excitation winding. The maximum output current of this generator is 55 A.
The choice of an alternating current generator is explained by the fact that it has a number of serious advantages over direct current generators. First of all, it develops a voltage sufficient to charge the battery at significantly lower speeds than a direct current generator. Furthermore, an alternating current generator has a smaller weight and dimensions than a direct current generator of equal power.
In a direct current generator, the entire load current is removed from the collector plates through the brushes, while in an alternating current generator there is no collector and only a small excitation current of the generator is supplied to the armature winding through the contact rings and brushes. Therefore, the wear of the brushes and contact rings is small, and the service life of the alternating current generator is significantly longer.
The generator is mounted on the engine on the right side and is driven by a V-belt drive from the crankshaft pulley. Through the holes in the ears of covers 1 and 23, the generator is fastened with a bolt to a cast iron bracket on the engine and with a stud to the tension bar. To prevent the ears of the covers from breaking off when tightening the bolt, there is a rubber buffer sleeve 32 in the hole in the ear of cover 1. Under the action of the tightening force of the bolt, the pressure sleeve (on the left in the picture) shifts, choosing the gap between the eye and the generator bracket, the buffer bushing 32 is compressed between the steel bushings and therefore the tightening force is not transmitted to the eye. The tension of the generator drive belt should be such that the belt deflection under a force of 10 kgf between the pulleys of the generator and the coolant pump is equal to 10-15 mm, or 12-17 mm between the pulleys of the coolant pump and the crankshaft. Weak belt tension leads to engine overheating due to insufficient efficiency of the fan and coolant pump, and strong tension leads to increased wear of the bearings of the generator and pump.
The main parts of the generator are the rotor, stator 27 and covers 1 and 23, cast from aluminum alloy.
The rotor consists of a shaft 8, on the corrugated surface of which a steel bushing and steel beak-shaped poles 18 and 30 are pressed, forming together with the shaft and the bushing the core of the electromagnet. Between the beak-shaped poles in a plastic frame the excitation winding 25 of the rotor is placed. The ends of the winding are brought out through the holes in the pole 30 and soldered to the terminals of the contact rings 4 and 5. The contact rings are mounted on a plastic bushing having a steel hub. Between the beak-shaped pole and the contact rings there is a plastic washer insulating the terminals of the excitation winding.
The rotor rotates in two sealed ball bearings. The bearings are greased during manufacture and do not require replenishment during operation. The inner race of the front bearing 22 is loosely mounted on the rotor shaft and, together with the spacer ring 21, is clamped between the pulley hub and the shaft flange by the pulley fastening nut. The outer race of the bearing 22 is pressed into the cover and clamped between two washers tightened by four screws. The ends of the screws are punched to prevent self-loosening. The inner race of the rear bearing 6 is pressed onto the rotor shaft. The outer race is pressed by a rubber ring. A pulley 19 with a fan for cooling the rectifier and the internal parts of the generator, made of sheet steel and connected by electric welding, is mounted on the rotor shaft on a segment key.
The stator is assembled from 1 mm thick electrical steel plates. The plates are connected by electric welding. On the inner side of the stator there are 36 semi-closed grooves, insulated with varnish or electrically insulating cardboard. A three-phase winding is placed in the grooves, secured from falling out with wooden wedges or plastic tubes. Each phase winding consists of six coils. The phase windings are connected in a star with the terminal (plug 11) of the zero point. This terminal has no marking. The relay of the control lamp of the accumulator battery charge is connected to it (if it is on the car).
On the back cover 1 of the generator, the voltage regulator 13 and the brush holder 14 with brushes 9 and 15 are fixed with screws. Through the brushes pressed by springs to the contact rings of the rotor, current is applied to the field winding. One of the brushes is connected to the "B" terminal of the voltage regulator, and the other to the "W" terminal.
The rectifier parts are also attached to the generator's rear cover. The rectifier is assembled using a three-phase bridge circuit from six BA-20 type silicon diodes - semiconductor devices that pass current in only one direction.
The diodes are located in a special rectifier block of the BPV6-50 type. The block consists of two aluminum holders 38 and 41 with diodes, fastened with rivets. In order to simplify the fastening parts of the rectifier, three diodes have a "plus" of the rectified current on the housing ("positive" diodes), and three diodes have a "minus" of the rectified current ("negative" diodes). Positive diodes are marked on the housing with red paint, and negative ones - with blue.
Negative diodes, which have a common terminal to "ground" in the rectifier circuit, are pressed into the holder 41 of the rectifier block. Positive diodes in the rectifier circuit have a common terminal connected to the generator bolt "30" and are pressed into the holder 38 of the rectifier block. The diodes are pressed in order to ensure effective heat dissipation from the diode housings to the holders of the rectifier block, which are blown with air for cooling.
The rectifier unit is attached to the cover 1 with three bolts 3, insulated together with the positive diode holder from the cover with plastic bushings. The nuts of these bolts simultaneously clamp the terminals of the diodes and the stator winding. The clamp "30" of the generator (bolt 10), which is the "plus" terminal of the rectifier, is connected to the holder 38. The "minus" terminal is the generator mass. The generator has a built-in small-sized microelectronic voltage regulator 13 of the Ya-112V type. It is a non-separable and non-adjustable design. Continuously and automatically adjusting the current flowing through the excitation winding of the generator, the regulator maintains the voltage at the generator output at a level of 13.6-14.6 V regardless of the load current and the rotor speed.
When the ignition is turned on, contacts "15" and "30/1" of the ignition switch are closed and through them voltage from the storage battery is supplied to terminal "B" of the voltage regulator. The regulator is unlocked and through the rotor winding (excitation winding) current begins to flow, which closes along the path: plus of the battery terminal" 30 "of the generator output "B" of the regulator field winding-output, "W" of the regulator-mass "minus" of the battery.
On vehicles with ignition relay (not shown in the diagram) the ignition switch contacts close the relay power supply circuit. It is triggered and voltage from the storage battery is supplied to the "B" terminal of the voltage regulator through the closed contacts of the ignition relay. The alternating voltage and current induced in the stator winding are rectified by the rectifier unit and the already rectified direct current, taken from the "30" terminal of the generator, is used to supply consumers.
When the generator rotor speed increases, when the voltage at the generator output exceeds 13.6-14.6 V, the voltage regulator locks and does not allow current to pass into the excitation winding of the generator. This leads to a sharp decrease in the generator voltage and the voltage regulator unlocks. The voltage increases again and the described process is repeated with a frequency of 25-250 times per second. The generator voltage at the rectifier output with the same frequency either increases or decreases. Due to the high frequency of unlocking and locking the regulator, voltage fluctuations are imperceptible and it can practically be considered constant, maintained at a level of 13.6-14.6 V.
Until 1984, relay 45 was installed on VAZ-2105 cars to turn on the battery charge indicator lamp. This relay of the RS-702 type had normally closed contacts that opened at a winding voltage of 5.3±0.4 V. The relay winding was under the influence of the rectified phase voltage of the generator. If this voltage was below the limit specified above, then current flowed through the closed contacts of the relay, feeding the indicator lamp in the instrument cluster and it burned, signaling that all consumers were powered by the battery, i.e. the generator was faulty. Since 1985, the relay has not been installed and the generator voltage is monitored only by a voltmeter, which is in the instrument cluster.
The wiring diagram of the generator 37.3701 has its own characteristics. With this generator, a combination of devices must be used, in which one end of the battery charge indicator lamp is connected to the "plus" of the power supply (orange wire), and the other end is connected to the "61" terminal of the generator with a brown wire with a white stripe. After the ignition is turned on, voltage is supplied to the "61" plug (connected to the "B" terminal of the voltage regulator) through the control lamp and it lights up. After starting the engine, the voltage at the "30" and "61" terminals of a serviceable generator should be the same and the control lamp should go out.