




Open large image in new tab »
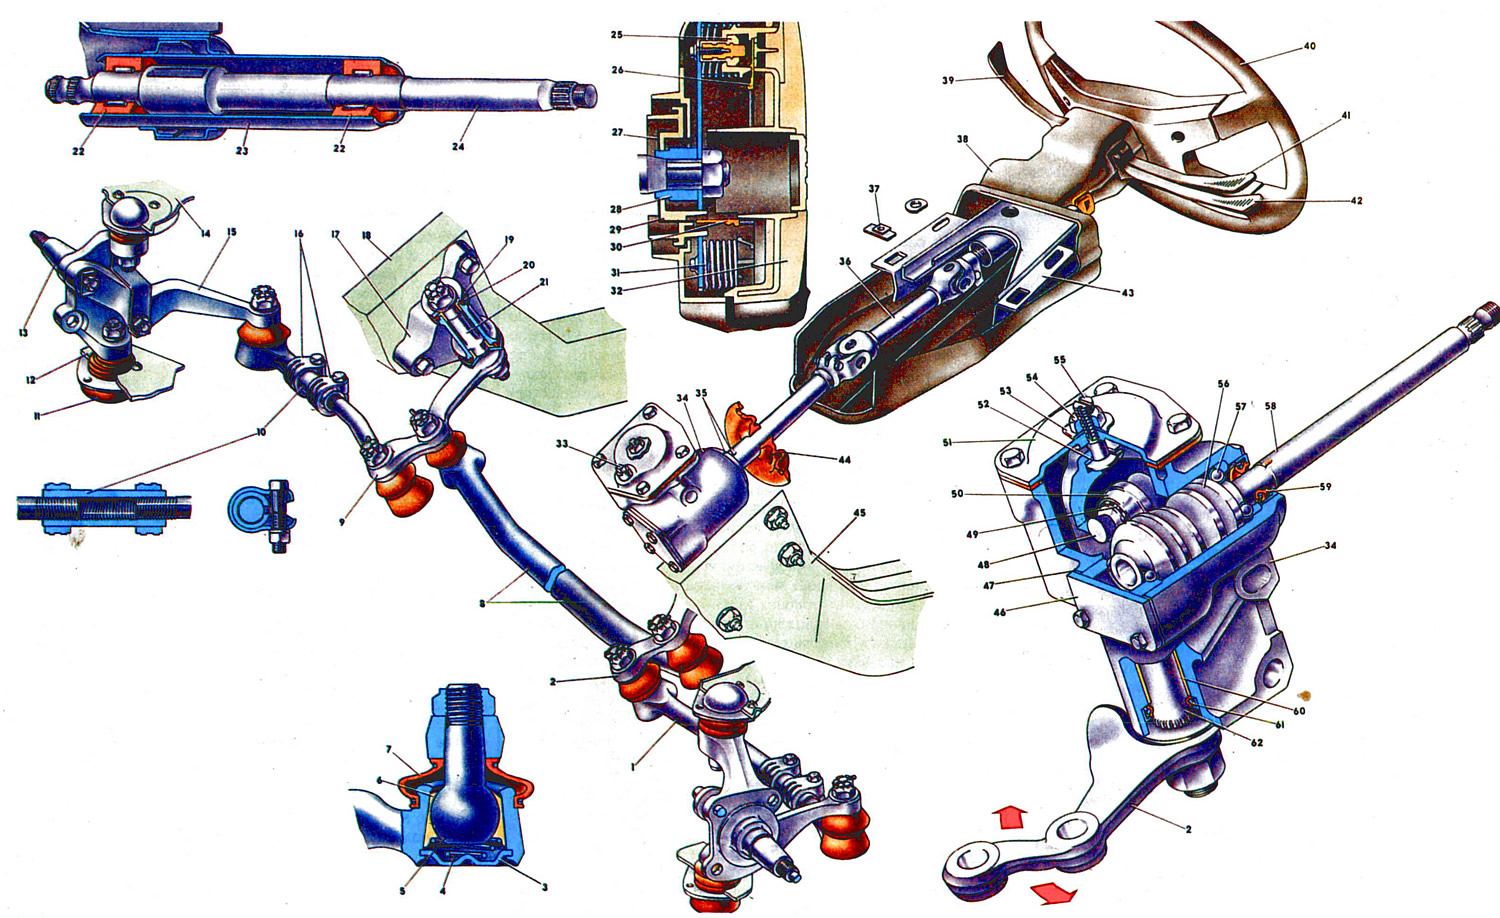
Fig. 25: 1. Lateral steering link. 2. Pitman arm. 3. Thrust washer of ball pin shell spring. 4. Ball pin shell spring. 5. Ball pin. 6. Ball pin shell. 7. Ball pin protective boot. 8. Middle steering link. 9. Idler arm. 10. Lateral steering link adjusting sleeve. 11. Lower ball joint of front suspension. 12. Lower arm of front suspension. 13. Right steering knuckle. 14. Upper arm of front suspension. 15. Right steering knuckle arm. 16. Adjusting sleeve tightening clamps. 17. Idler arm bracket. 18. Right side member of body floor. 19. Idler arm axle bushing. 20. Bushing sealing ring. 21. Idler arm axle. 22. Upper shaft needle bearing. 23. Steering shaft mounting bracket tube. 24. Upper steering shaft. 25. Wire tip. 26. Horn switch holder. 27. Lower contact ring. 28. Wheel hub. 29. Lower contact ring holder. 30. Wire from lower contact ring. 31. Horn switch spring. 32. Horn switch. 33. Oil filler plug. 34. Steering gear housing. 35. Marks for setting the roller (pitman arm) to the middle position. 36. Intermediate steering shaft. 37. Bracket front fixing plate. 38. Steering shaft trim casing. 39. Windscreen wiper and washer switch lever. 40. Steering wheel. 41. Direction indicator switch lever. 42. Headlight switch lever. 43. Steering shaft mounting bracket. 44. Steering shaft seal. 45. Left side member of body floor. 46. Lower cover of steering gear housing. 47. Adjusting shims. 48. Pitman arm shaft roller axle. 49. Roller ball bearing. 50. Roller. 51. Upper cover of steering gear housing. 52. Adjusting screw plate. 53. Lock washer. 54. Lock nut. 55. Adjusting screw. 56. Worm. 57. Worm bearings. 58. Worm shaft. 59. Worm shaft seal. 60. Worm shaft sleeve. 61. Pitman arm shaft seal. 62. Pitman arm shaft.
The vehicle uses a trauma-safe steering system with an intermediate cardan shaft.
In steering, a distinction is made between the steering mechanism and the steering drive. The steering mechanism transmits force from the driver to the steering drive, and the steering drive transmits force to the steered wheels.
The steering gear consists of a worm gear, a steering wheel 40, a composite steering shaft and its mounting parts. Worm gear (gear ratio 16.4) is located in the aluminum housing 34, which is attached to the left side member of the body with three bolts with self-locking nuts. Two holes for the housing mounting bolts are oval in shape to ensure correct installation of the steering gear. With this installation, the angle between the shaft 58 of the worm and the horizontal should not exceed 32°, and the gap between the shaft 58 and the brake pedal should be at least 5 mm.
In the crankcase 34, a worm 56 is mounted on two radial thrust bearings 57. The bearings do not have inner rings. Their role is performed by raceways made on the ends of the worm. The clearance in the worm bearings is adjusted by gaskets 47 installed under the lower cover. At the exit from the crankcase, the worm shaft is sealed with an oil seal 59. On the splined part of the worm shaft, an annular groove is made for the tie bolt of the cardan joint fork. In engagement with the worm is a double-ridge roller 50, which rotates on the axis 48 on a double-row ball bearing 49. The ends of the axis after its pressing into the hole in the shaft 62 are riveted using electric heating, i.e. this connection is non-detachable.
The pitman shaft with its cylindrical ground part is installed in two bronze bushings 60 and is sealed with a seal 61 at the exit from the crankcase. The pitman arm 2 is mounted on the conical splines of the lower pitman shaft in one specific position, with the double spline on the shaft aligned with the double recess in the pitman hole.
The engagement of the worm gear is performed with a 5.5 mm offset of the roller and worm axes, which allows for adjustment of the gap-free engagement of the roller with the worm as they wear out. This is ensured by the axial offset of the bipod shaft using the adjusting screw 55. The screw head enters the T-shaped cutout of the bipod shaft together with the plate 52, which ensures the required fit of the screw head. The adjusting screw 55 is screwed into the upper cover 51, fixed from turning with a washer and tightened with a lock nut. When the adjusting screw is screwed into the cover, the bipod shaft is lowered, and the gap in the engagement of the roller with the worm is selected.
To determine the accuracy of the clearance adjustment in the worm bearings and in the engagement of the roller with the worm, use a dynamometer that measures the moment of resistance (friction) to rotation. In this case, first measure the friction moment of the worm shaft without installing the pitman shaft. It should be within 20-50 N cm (2-5 kgf cm). By selecting the thickness of the adjusting linings 47, set the desired clearance (friction moment) in the worm bearings. Then, after installing the pitman shaft and adjusting the clearance in the engagement, check the friction torque of the worm, which should be equal to 90-120 N cm (9-12 kgf cm) when turning the worm shaft by 30° both to the left and to the right from the middle position and decreases smoothly to 70 N cm (7 kgf cm) when turning from an angle of 30° to the stop.
On the upper end of the housing 34 of the steering gear and on the shaft 58 of the worm there are marks (scores) 35, when aligned, the roller 50 is set in the middle position, and the steered wheels ensure straight-line movement of the car. In this position, the steering wheel spoke should be horizontal. This indicates the correct connection of the worm shaft with the intermediate shaft.
The worm gear parts are lubricated with TAD-17i oil, which is poured through the hole closed by plug 33, filling capacity 0.215 l.
The steering wheel is made of plastic reinforced with a steel frame. The hub 28 of the steering wheel has splines with a double recess, and the upper shaft 24 has single splines, which ensures that the wheel is connected to the shaft in only one position. The steering wheel is secured to the shaft 24 with a nut, which is punched at one point after tightening. A plastic holder 29 of the lower contact ring 27 is secured to the hub 28 from below, along which the switch contact slides. This contact is connected by wires to the winding of the horn switch relay.
(The material is posted on the website: vazbook.ru)
The holder 26 of the horn switch is attached to the steering wheel hub with screws. It is isolated from the "ground". The lower contact ring 27 is connected to the wires 30, the tips 25 of which are mounted in the horn switch 32. Springs 31 are installed between the switch 32 and the spoke. When the switch 32 is pressed, the tips 25 of the wires close the lower contact ring to the "ground", i.e. the winding of the horn relay. When the switch is released, the contacts open under the action of the springs 31.
For driver safety, the steering shaft is made composite. It consists of the upper 24 and intermediate 36 shafts with cardan joints. The upper shaft rotates on two needle bearings 22 with rubber bushings. The bearings are rolled into the pipe 23 of the bracket 43. Closer to the lower support on the shaft 24, a ring with a groove for the anti-theft device is welded.
The intermediate shaft has two non-separable cardan joints on needle bearings at its ends. The joint forks are mounted on shaft 58 of the worm and upper shaft 24 and secured with tie bolts.
Bracket 43 is attached to the body panel bracket with four bolts, and the heads of the two lower bolts are screwed into the welded nuts of the panel bracket and twisted at the moment of maximum tightening. Fixing plates 37 are installed under the lower bolts, the rigidity of which is calculated for a certain load. The upper bolts are welded and bracket 43 is attached to them with nuts with figured and spring washers.
When the car collides with an obstacle, the load on the bracket 43 mounting bolts increases and under its influence the ends of the plates 37 are deformed. In this case, the bracket 43 slips through the front mounting bolts, turning relative to the upper mounting bolts, as a result of which the steering wheel moves away from the driver's chest area, which reduces the likelihood of serious injury. The steering shaft is covered with a casing 38 consisting of upper and lower parts connected to each other with screws.
The steering gear includes: a pitman arm 2, a middle 8 and side rods 1, a pendulum lever 9, and pivot levers 15. The specified parts are connected to each other by ball joints. The pitman arm is connected to the middle and side rods. It has a stop that limits the turning angle of the front wheels.
The middle rod 8 is one-piece and has sockets at the ends for placing the ball joint parts. The side rods 1 are composite. Each of them consists of two ends connected to each other by a threaded adjusting coupling 10. The coupling is fixed on the rod ends by two tightening clamps 16. With this design of the side rods, it is possible to change their length, which is necessary to adjust the toe-in of the steered wheels. The outer ends of the side rods are pivotally connected to the steering levers 15, which are bolted to the steering knuckles. The inner end of the right side rod is pivotally connected to the pendulum lever, and the end of the left side rod is connected to the pitman arm. All ball joints are of the same type.
The tie rod ball joint consists of a steel pin 5, the spherical head of which rests on a conical split insert 6 made of plastic with high anti-seize properties. Conical spring 4, pressing the insert to the spherical head of pin 5, automatically maintains a gap-free connection between them. At the bottom, in the socket of the tip, a washer 3 is rolled, which is a support for the spring. The conical part of the pin enters the conical hole of the pivot lever (bipod or pendulum arm) and it is fastened with a crown nut fixed with a cotter pin. Ball joints are filled with SRB-4 grease during assembly and sealed: from the bottom with a support washer 3, from the top with a reinforced protective cover 7. Replenishment or replacement of the lubricant is not required during vehicle operation. If the protective covers are in good condition and ensure cleanliness inside the hinges, then the service life of the latter is not limited. If the hinge is in good condition,the thrust tip should have an axial movement relative to the finger by 1-1.5 mm and should not have a noticeable runout.
The pendulum arm bracket is secured to the inside of the right side member with two bolts with self-locking nuts. The bracket is cast from an aluminum alloy. In its through groove there are two plastic bushings 19, on which the axle 21 of the pendulum arm rotates. Washers are pressed to the ends of the bushings. The upper washer is mounted on the chamfers of the axle and pressed with a crown nut with a torque that ensures rotation of the lever with a force of 10-20 N (1-2 kgf), applied to its end. The lower washer is pressed to the bushing with a self-locking nut with a torque of 106 N·m (10 kgf·m). The same nut secures the pendulum lever 9 to the axle. Rubber sealing rings 20 are installed between the end surfaces of the washers and the pendulum lever bracket housing. During assembly, the cavity between the bushings is filled with Litol-24 grease. The bushings themselves are lubricated with the same grease.
If the steering is in good working order, the steering wheel free play should not exceed 5° (18-20 mm on the wheel rim), and the force required to turn the wheel when turning on a smooth plate is no more than 250 N (25 kgf).