




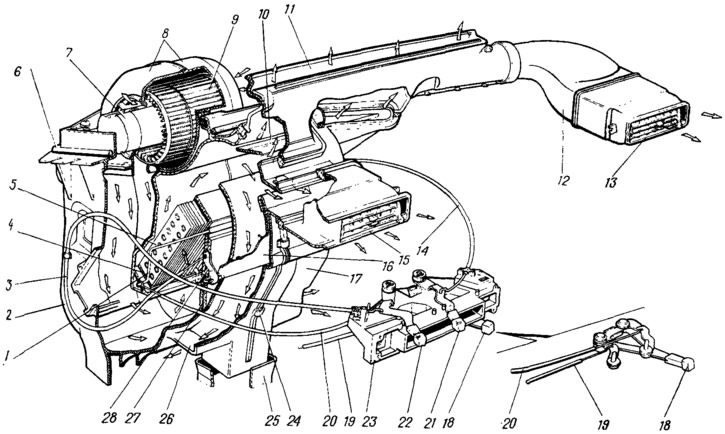
Figure 156. Cabin heater:
1 - heater control flap lever; 2 - left heater casing; 3 - foot warmer flap pull; 4 - radiator sealing gasket; 5 - heater radiator: 6 - heater seal; 7 - Electric motor; 8 - fan casings: 9 - impeller; 10 - Windshield heating flap; 11 - Windshield heating air duct; 12 - side nozzle air duct; 13 - side nozzle; 14 - Windshield heating flap rod; 15 - central nozzles; 16 - foot warmer flap; 17 - right heater casing; 18 - heater control handle; 19 - crane control rod; 20 - heater control flap rod; 21 - Handle for supplying air to the windshield; 22 - handle for air supply to the driver's and passengers' feet; 23 - control lever bracket; 24 - heater casing mounting bracket; 25 - internal ventilation air duct; 26 - window in the heater casing; 27 - heater control flap; 28 - foot warmer flap lever.
Outside air enters under the rear edge of the hood into the air intake box in front of the windshield. Rainwater in the air intake box is separated by a plastic water-deflecting shield, flows to the bottom of the box, and from there into the engine compartment through two rubber valves. The elastic valves prevent air from being sucked in from the engine compartment.
The air heated in the heater is directed into the passenger compartment through a system of air ducts, which are attached to the instrument panel from below, and through the air duct 25 of the internal ventilation. The air ducts under the panel are sealed with gaskets.
The heater consists of a right 17 and left 2 plastic casings, which are connected to each other along the perimeter with fastening brackets 24. To seal the casings, a special harness is placed in the grooves. The casings have a number of partitions and flaps. The latter ensure the necessary degree of mixing of air heated in the radiator 5 and directing it to the desired area of the passenger compartment.
To supply forced air to the passenger compartment, an electric fan is attached to the top of the heater with two screws. It can also be removed from the engine compartment, after disconnecting the wires. The electric fan consists of two plastic casings 8, to which an electric motor 7 of type 45.3730 is attached. An impeller 9 of the fan is installed on its shaft. To obtain the required rotation speed of the impeller, there is an additional resistor, which is attached with a screw on the left side in the hole in the casing 2 of the heater. Two resistor spirals provide three rotation speeds of the impeller: the first - when both spirals are on, the second - when one spiral is on, and the third, maximum (up to 4000 rpm) - when turning on the electric motor without resistors.
Radiator 13 (figure 157) the air heater is installed in the heater housings 10 and 18, is fastened with three screws to the right housing and is sealed with a polyurethane foam gasket 12. The heater radiator consists of two rows of tubes, cooling plates and two plastic tanks. The tubes and cooling plates are made of aluminum. To increase the heat transfer of the radiator, polypropylene turbulators are inserted into the tubes, preventing laminar movement of the liquid.
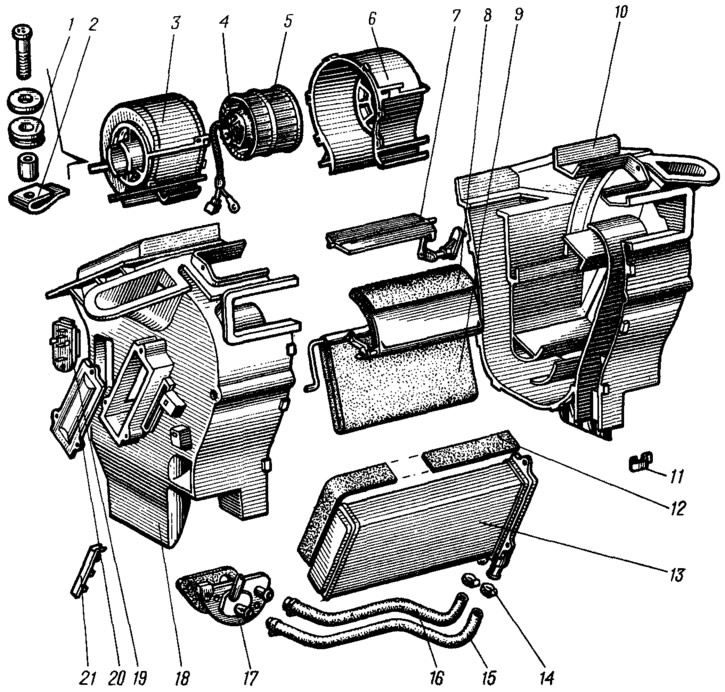
Figure 157. Heater parts:
1 - elastic bushing: 2 - spring nut; 3 - left fan shroud; 4 - electric motor: 5 - impeller; 6 - right fan casing: 7 - windshield heating flap; 8 - driver and passenger footwell heating flap; 9 - heater control flap; 10 - right heater casing; 11 - heater casing mounting bracket; 12 - radiator gasket; 13 - radiator; 14 - clamp; 15 - supply hose; 16 - drain hose; 17 - heater tap; 18 - left heater casing; 19 - resistor; 20 - sealing cover; 21 - heater control flap axis support.
The right radiator tank has two pipes that are connected by rubber hoses 15 and 16 to the heater tap 17. The tightness of the hose connection is achieved by tightening screw clamps 14.
The heater tap is secured with two nuts on the front panel. At the point where the tap is secured, the body interior is sealed from the engine compartment with a special seal. The heater tap is also connected to the cooling system with rubber hoses. The circulation of liquid through the heater radiator is carried out by the cooling system pump. Tap (figure 158) consists of a plastic housing 3 with two pairs of pipes. In the housing of the tap on the side of the supply line, a plate valve 2 of the tap with an opening for passing the coolant is installed on the axis. The lever 9 of the valve is connected by a rod to the lever of the air heating control handle. When turning the lever 9, the opening in the valve 2 opens the line for the flow of liquid into the heater radiator.
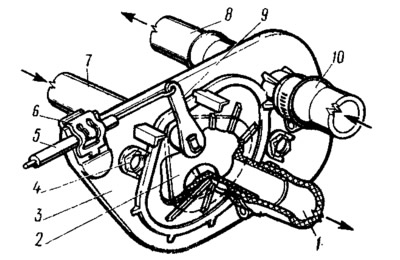
Figure 158. Heater tap:
1 - hose for supplying liquid to the heater radiator; 2 - valve; 5 - crane body; 4 - tap mounting nut; 5 - shell with crane control rod; 6 - traction casing mounting bracket; 7 - hose for supplying liquid to the heater tap; 8 - hose for draining liquid from the tap; 9 - valve lever; 10 - hose for draining liquid from the heater radiator.
The heater is controlled by three handles 13 (figure 159), 14 and 15, the levers of which are installed on the axles of a plastic bracket secured with four screws to the instrument panel. From the passenger compartment side, the bracket is covered with a lining with the corresponding symbols of the positions of the heater and ventilation control handles. To prevent spontaneous movement of the handles, their levers on the axles are pressed with friction washers. The handles are placed on the ends of the levers and fixed by the stampings. To remove the handles, it is necessary to first bend back the upper part of the upper handles at the junction with a thin sharp tool, and the lower part of the lower handles. The levers of the handles are connected by rods 16, 17, 18 and 19 to the levers of the drive of the corresponding flaps and to the lever of the heater tap 4. The ends of the rod casings are fastened with clamps to the control lever bracket, the heater casings and the tap body.
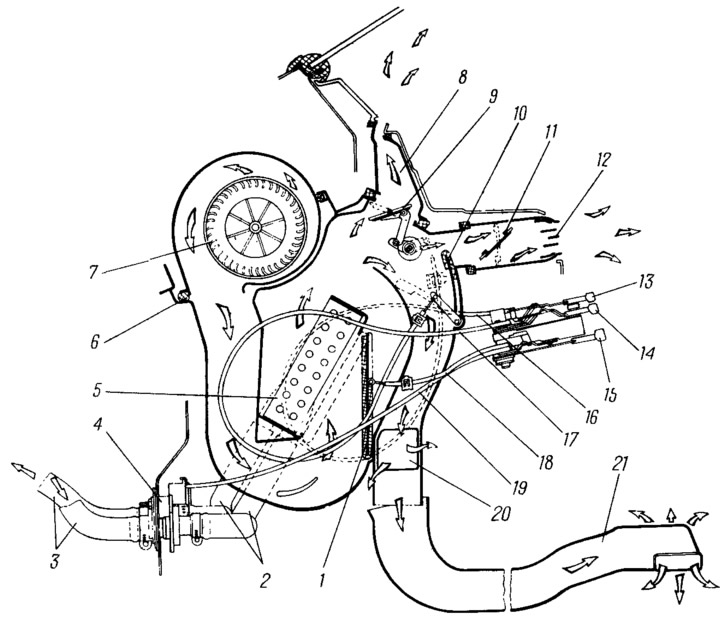
Figure 159. Heater operation diagram:
1 - heater control flap; 2 - heater radiator connection hoses; 3 - hose connecting the tap to the cooling system; 4 - crane; 5 - radiator; 6 - heater seal; 7 - electric fan; 8 - Windshield heating air duct; 9 - Windshield heating flap; 10 - foot heating flap; 11 - central nozzle flap; 12 - central nozzles; 13 - Handle for supplying air to the windshield; 14 - handle for air supply to the feet of the driver and passengers; 1 5 - heater control handle; 16 - Windshield heating flap rod; 17 - footwell heating flap pull; 18 - heater control handle rod; 19 - crane control rod; 20 - window in the heater casing; 21 - internal ventilation air duct.
The air heating control handle 15 acts through rods 19 and 18 on the lever of the tap 4 and the actuator lever of the heater control flap 1. When the handle 15 is fully moved to the right, the tap 4 and flap 1 open, air will be supplied by the electric fan 7 to the heater radiator 5, through which the heated liquid is driven. In the middle position of the handle 15, the tap and flap 1 will be in intermediate positions, in which the air will pass both through the radiator and bypassing it. This more reliably ensures the required degree of air heating. In the extreme position of the handle 15, the heater tap 4 and the heater control flap 1 are closed, as a result of which the air supplied to the passenger compartment will not be heated.
The upper left handle 14 for supplying air to the feet of the driver and passengers is connected by a rod 17 to the damper lever 10. When the handle is moved to the left, the foot heating damper opens, air is directed from the heater casings into the window 20 on the left and right sides to the feet of the driver and passenger located in the front seats, and also through the air duct 21 of the internal ventilation to the feet of the passengers in the back seat.
The handle 13 for supplying air to the windshield is connected by a rod 16 to the lever of the drive of the flap 9 of the windshield heating, which closes or opens the path of air through the air duct 8 to the glass.
To supply air directly to the passengers, as well as to blow air onto the side windows of the car, the heater has left and right side nozzles 13 (see figure 156) and two central nozzles 15. A damper 2 is installed in the body of each nozzle (figure 160) with polyurethane foam seals. By changing the position of the damper with lever 5, the ventilation intensity is regulated. The direction of the air flow is changed by lever 6, which allows you to turn the nozzle with guides 8, as well as the blades 9 to the desired position.
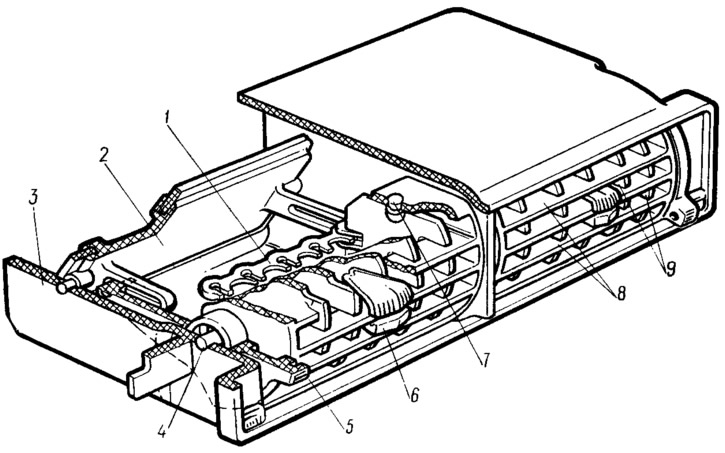
Figure 160. Central nozzles:
1 - nozzle blade pusher; 2 - left nozzle flap; 3 - body; 4 - nozzle axis; 5 - damper drive lever; 6 - blade handle; 7 - blade axis; 8 - blade guides; 9 - nozzle blades.
Ventilation and heating are regulated depending on the outside air temperature. In warm weather, outside air can enter the passenger compartment in the following ways: through the front door windows with the windows fully or partially lowered; into the upper slots of the air duct 8 (see figure 159) heated windshield; into the side and central nozzles with the flaps open 11; into the windows 20 and the air duct 21 of the internal ventilation. If the car is moving at a low speed, you can increase the amount of incoming air by turning on the electric fan of the heater to one of the modes.
To prevent the windshield and door windows from fogging up, cold air is directed at them. To increase the amount of air supplied to the windows, close the flaps 11 of the central and side nozzles. If it is necessary to warm up the incoming air, open the heater valve 4 and the heater control flap 1 by moving the handle 15 to the right. If necessary, turn on the electric fan.
At an outside temperature of minus 20°C, the heater provides an average temperature in the cabin at maximum heating mode of +20°C, and in the footwell area of +25°C.
The cars have exhaust ventilation that sucks air out of the car body. On VAZ-2108 cars and its modifications, air is sucked into the gaps under the roof lining (mainly from the rear of the cabin), gets into the internal cavities of the central pillars, then through the rubber air ducts in the pillars and the holes in the rear edges of the trims comes out. The suction is carried out due to the vacuum that occurs when the car is moving at the rear edges of the central pillars of the body.
On VAZ-2-109 and 21093 cars, exhaust ventilation is performed in the rear parts of the body openings for the side windows. Ventilation is also carried out due to the vacuum that occurs at the deflectors when the car is moving. Air is sucked from the rear part of the passenger compartment under the deflectors' trims, presses the rubber valves and comes out through the deflectors' openings. The rubber valves prevent outside air from entering the passenger compartment during a side wind.