




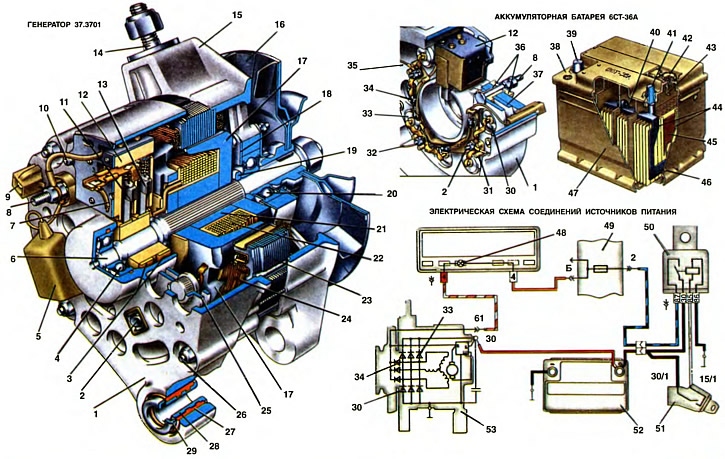
1. Generator cover from the slip ring side. 2. Rectifier unit mounting bolt. 3. Slip rings. 4. Rotor shaft ball bearing from the slip ring side. 5. 2.2 μF ±20% capacitor for radio interference suppression. 6. Rotor shaft. 7. Additional diode common terminal wire. 8. Generator clamp "30" for connecting consumers. 9. Generator plug "61" (common terminal of additional diodes). 10. Output wire "B" of the voltage regulator. 11. A brush connected to the output "B" of the voltage regulator. 12. Voltage regulator. 13. A brush connected to the output "W" of the voltage regulator. 14. Pin for attaching the generator to the tensioner. 15. Generator cover on the drive side. 16. Fan impeller with generator drive pulley. 17. Pole tip of the rotor. 18. Bearing mounting washers. 19. Remote ring. 20. Ball bearing of the rotor shaft on the drive side. 21. Steel bushing. 22. Rotor winding (excitation winding). 23. Stator core. 24. Stator winding. 25. Rectifier unit. 26. Generator tie bolt. 27. Buffer sleeve. 28. Sleeve. 29. Pressure sleeve. 30. Negative diode. 31. Insulating plate. 32. Stator winding phase terminal. 33. Positive diode. 34. Additional diode. 35. Positive diode holder. 36. Insulating sleeves. 37. Negative diode holder. 38. Cover. 39. Positive terminal. 40. Barrette. 41. Negative terminal. 42. Plug. 43. Electrolyte level indicator. 44. Separator. 45. Positive plate. 46. Negative plate. 47. Housing. 48. Low battery indicator lamp. 49. Fuse box. 50. Ignition relay. 51. Ignition switch. 52. Battery. 53. Generator.
Generator
Technical specifications:
- Maximum recoil current (at 13V and 5000rpm), A - 55
- Limits of regulated (voltage, V-14.1 ±0.5
- Direction of rotation (from the drive side) - Right
- Generator weight, kg - 4.85
VAZ-1111 vehicles use a three-phase alternating current generator type 37.3701 with a built-in rectifier unit and microelectronic voltage regulator. It serves to supply the vehicle's consumers with electric current and to charge the battery.
The generator is mounted on the left side of the engine (front, if you look in the direction of the car's movement). The generator is secured to the bracket on the cylinder block by a bolt passing through the tabs of covers 1 and 15, and to the tension bar by stud 14. Cover 1 has a buffer device consisting of a steel 28, rubber 27 bushing and a pressure bushing 29. When tightening the nut of the generator mounting bolt, the pressure bushing rests against the end of the rubber, deforms it and presses bushing 28 to the mounting bracket. As a result, the axial clearance between the tabs of the generator covers and the bracket is selected, and the covers are relieved from the axial tightening force, which can deform or break off the tabs of the covers.
The generator is driven from the crankshaft pulley by a V-belt transmission with a gear ratio of 1:2.04. The belt tension is adjusted by turning the generator relative to the mounting bolt to the bracket. The belt tension should be such that under a force of 10 kgf the belt deflects by 10...15 mm. If the tension is weak, the belt may slip on the pulleys, which leads to a decrease in the generator voltage and return current. In addition, the pulley, shaft and bearings of the generator become very hot, the grease in the bearings overheats, and they may fail. Excessive belt tension increases the load on the bearings and causes their premature wear.
The main parts of the generator are: rotor, stator, cover 1 with rectifier block 25, cover 15 with bearing 20, pulley with fan 16 and brush holder with voltage regulator 12. The covers and stator are pulled together into a single unit by four tie bolts 26.
The generator rotor is a rotating electromagnet. Steel beak-shaped pole pieces 17 and bushing 21, pressed onto rotor shaft 6, form the electromagnet core. Between the pole pieces in a plastic frame is the rotor winding 22, called the excitation winding. Current is supplied to the winding through copper contact rings 3, to which the winding terminals are soldered. The rings are located on a plastic bushing, also pressed onto the rotor shaft.
The rotor shaft rotates in two ball bearings: 4 and 20, installed in covers 1 and 15. The bearings are of a sealed type. The grease incorporated into them during manufacture is sufficient for the entire service life of the generator. The rear bearing 4 is pressed onto the rotor shaft, and its outer race is pressed by a rubber ring placed in a groove in the cover. The front bearing 20 is pressed into cover 15 and, for reliability, is clamped between two steel washers 18, tightened with four screws. The ends of the screws are punched. The inner race of this bearing, together with the spacer ring 19, is clamped by the pulley fastening nut between the pulley hub and the shaft step.
The generator stator consists of a core 23 with a winding 24. The core is assembled from electrical steel plates, connected in four places by electric welding. On the inner surface of the core there are 36 semi-closed grooves, insulated with a fluoroplastic film. The stator winding is laid in the grooves, the ends of which are connected in a star without a zero point.
Fan 16 serves to cool the rectifier, stator and rotor, which heat up when the generator operates under load. Cooling air enters the windows of cover 1, passes between the stator and rotor and is thrown out through the windows of cover 15 by the fan impeller. The fan and pulley are made of sheet steel and are connected by electric welding.
The rectifier, which converts the alternating current of the generator into direct current, is made in the form of a rectifier block 25. It is two aluminum plates with six VA-20 type diodes pressed into them — semiconductor devices that pass current only in one direction. To simplify the design of the rectifier, diodes of different polarity are used — "positive" and "negative". The positive diodes on the body create a "plus" of the rectified voltage, and the negative ones — a "minus". Positive diodes are pressed into plate 35 of the rectifier block, and negative ones — into plate 37.
The rectifier unit is attached to the cover 1 with three bolts 2, insulated together with the plate 35 of the positive diodes from the cover with plastic bushings. The nuts of the bolts 2 simultaneously clamp the terminals of the diodes and the stator winding. The clamp "30" (8) of the generator, which is the "plus" terminal of the rectifier, is connected to the plate 35. The "minus" terminal is the generator mass.
Three additional diodes 34 are also installed on plate 35 of the rectifier block. The voltage taken from these diodes is used to power the excitation winding 22 and the generator health control circuit using the control lamp 48 of the battery discharge.
The generator voltage is regulated by a microelectronic contactless voltage regulator 12, fixed with a screw on the cover 1. This is a non-separable and non-adjustable unit, and it completely lacks any electromagnetic relays with contacts. The generator excitation winding power supply circuit is closed or opened by opening or closing a powerful output transistor in the regulator, depending on the value of the control voltage at the "B" terminal of the regulator.
A plastic brush holder with two brushes 11 and 13 is inserted into the groove of the voltage regulator, through which the generator field winding is fed. The brush 11 is connected to the output "B" of the voltage regulator, and the brush 13 is connected to the output "W". This pin is located on the inside of the controller and is not marked on its body.
Generator operation
When the ignition is turned on, the contacts "15/1" and "30/1" of the ignition switch are closed, then the contacts "30" and "87" of the ignition relay 50, and a current begins to flow through the generator field winding, which closes along the path: "plus" of the battery 52-contacts "30" and "87" of the ignition relay 50 — fuse 2 of the fuse box-control pump 48-output" 61 "of the generator-output" B "of the voltage regulator 12-field winding 22-output "W", output transistor of the voltage regulator-mass.
The 48-discharge control lamp of the battery lights up, signaling that the excitation winding is powered by the battery.
The current flowing through the excitation winding creates a magnetic flux around the rotor poles. After the engine starts, the generator rotor rotates and under each stator tooth passes either the south or north pole of the rotor. Therefore, the magnetic flux passing through the stator teeth changes in magnitude and direction. This alternating magnetic flux crosses the turns of the stator winding and creates an electromotive force in it.
The alternating voltage and current induced in the stator winding are rectified by the rectifier unit, and the rectified direct current taken from the generator terminal "30" is used to power the consumers. At the same time, the rectified voltage is taken from the common terminal of the additional diodes 34 to power the generator excitation winding.
In a working, serviceable generator, the voltages on terminal "30" and on the common terminal of the additional diodes (plug "61") are equal. Therefore, the current does not flow through the control pump 48 and it does not light. In this case, the excitation winding of the generator is powered by a rectifier on three additional diodes, and the battery is charged by the generator.
If the control lamp 48 is on, it indicates a fault in the generator, that it does not provide voltage or it is lower than the voltage of the battery. In this case, the voltage on the plug "61" (generator voltage) below voltage at terminal "30" (battery voltage). Therefore, a current flows in the circuit between them, passing through the control lamp, and it lights up.
As the rotor speed increases, the generator voltage increases. When it begins to exceed the level of 13.6...14.6 V, the output transistor in the voltage regulator 12 locks and the current through the excitation winding is interrupted. The generator voltage drops, the transistor in the regulator unlocks and again passes the current through the excitation winding.
The higher the generator rotor speed, the longer the transistor lock time in the regulator, and therefore the more the generator voltage decreases. The described process of locking and unlocking the regulator occurs with a high frequency. Therefore, the voltage fluctuations at the generator output are unnoticeable, and it can practically be considered constant, maintained at a level of 13.6...14.6 V.
In 1996, the design of the voltage regulator and brush holder was changed. Now the voltage regulator is placed in a metal case (like a powerful transistor) and is riveted to the brush holder, i.e. forms a non-separable unit with it. The new voltage regulator does not have terminal "B", and voltage is supplied only to terminal "B". According to their characteristics, the old and new voltage regulators are identical and are interchangeable when assembled with the brush holder.
Battery
The battery is lead-acid, type 6ST-36A, low-maintenance. It is designed to supply the car's consumers with electric current when the engine is not running, as well as to supply the starter when starting the engine. Batteries are manufactured by several factories and therefore may have slight differences in design.
The battery consists of six series-connected batteries, each of which has an EMF of 2.1 V when charged. Thus, the total EMF of the battery is 12.6 V. The nominal capacity of the battery is 36 Ah at a 20-hour discharge mode with a current of 1.8 A.
The batteries are placed in a polypropylene translucent case 47, divided by partitions into six sections. The jumpers connecting the individual batteries pass through the partitions of the sections and are welded to the bars 40. The batteries are covered from above with a common polypropylene cover 38, welded to the case by ultrasonic welding. The cover has openings for filling the electrolyte and for the passage of the battery terminals.
Each battery consists of a block of alternating plates - positive 45 and negative 46. Plates of the same polarity are welded to the 40 bars, which serve to secure the plates and output current. The plate grids are cast from an alloy with a low antimony content. As a result, the processes of electrolyte decomposition and self-discharge of batteries slowed down. This made it possible to check the level and density of the electrolyte much less often, which is why the batteries began to be called low-maintenance or maintenance-free.
The plates in the blocks are insulated from each other by thin and microporous separators 44, made in the form of envelopes into which the positive plates are inserted. The small thickness and high porosity facilitate the penetration of electrolyte through the separators, which reduces the internal resistance of the battery and allows for a greater discharge current.
The battery is a chemical current source. The electrolyte in it is a solution of sulfuric acid in distilled water. The density of the electrolyte of a fully charged battery at 25°C should be 1.28 g/cm³ year-round for the central and southern regions of the country, and for the northern regions (with an average January temperature from -50 to -30°C) 1.30 in winter and 1.28 g/cm³ in summer.
When the battery is discharged, the sulfuric acid of the electrolyte interacts with the active mass of the plates and turns it into lead sulfate, while the amount of acid in the electrolyte decreases and its density decreases. Therefore, the degree of discharge of the battery can be judged by the density of the electrolyte. For example, a decrease in density by 0.04 g / cm³ corresponds to a battery discharge of 25%, and by 0.08 g / cm³ - by 50%. A battery discharged by more than 50% in summer and 25% in winter must be recharged.
When charging a battery, under the action of the charging current flowing through it, lead sulfate in the positive plates turns into lead peroxide, and in the negative plates - into spongy lead. At the same time, sulfuric acid is released into the electrolyte, and its density increases.
The normal electrolyte level in the batteries should be between the "MIN" and "MAX" marks on the translucent battery case. If there are no marks, the level should be 5...10 mm above the edge of the separators and not rise above the lower edge of the indicator 43.