




Crankshaft
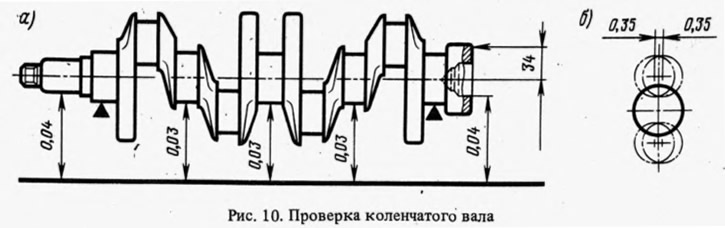
Inspect the crankshaft. Cracks in any place of the crankshaft are not allowed. Scratches, nicks and marks are not allowed on the surfaces mating with the working edges of the seals. Install the crankshaft with the outer main journals on two prisms and check the runout with an indicator in the places indicated in Fig. 10, a. The numbers in the figure indicate the permissible runout and misalignment of the journals.
The diameters of the main and connecting rod journals are measured. The journals should be ground when worn to a diameter 0.005 mm smaller than the minimum for a given crankshaft size, and also if the ovality of the journals is greater than 0.03 mm or there are nicks and scratches on them. The diameters of normal-size journals are given in Table 2, and the diameters of repair sizes (reduced by 0.25; 0,5; 0.75 and 1.00 mm) are given above in sec. 1.4.1.
The journals are ground to the nearest repair size. The distance between the axes of the connecting rod and main journals should be such that the piston stroke is within (66±0.125) mm. The radii of the journal fillets should be 2.8-3 mm.
The ovality and conicity of the main and connecting rod journals after grinding should be no more than 0.007 mm, and the displacement of the axes of the connecting rod journals from the plane passing through the axes of the connecting rod and main journals should be no more than ±0.35 mm (see fig. 10, 5). To check, install the shaft with the outer main journals on prisms and adjust the shaft so that the axis of the crankpin of the 1st cylinder is in a horizontal plane passing through the axes of the main journals. Then, use an indicator to check the vertical displacement of the crankpins of the 2nd, 3rd and 4th cylinders relative to the crankpin of the 1st cylinder. After grinding the journals, polish them using diamond paste or GOI paste.
After grinding and subsequent finishing of the journals, the plugs of the oil channels are removed, and then the sockets are driven out (the diameter of the sockets is 10-0,036 mm) of plugs with countersink A.94016/10, put on mandrel A.94016. Carefully wash the crankshaft and its channels to remove residual abrasive and blow with compressed air. Having completed these operations, press in new plugs and calk each at three points with a center punch.
On the first cheek of the crankshaft, the value of reduction of the main and connecting rod journals is marked (for example, K 0.25; W 0.50).
Bearing inserts
If there are any scratches, scoring, peeling or increased wear, the liners are replaced. No adjustment operations should be performed on the liners. If, when checking the liners, it turns out that they can be used again, then the clearance between them and the crankshaft journals is checked. The clearance can be determined by calculation, by measuring the diameters of the journals, the bearing beds and the thickness of the liners. If the clearance exceeds the maximum permissible, equal to 0.15 mm for the main journals and 0.10 for the connecting rod journals, the liners are replaced with others of increased thickness after grinding the journals. A sign of correct assembly and mating of the journals with the corresponding liners is the free rotation of the crankshaft.
Seals
Two self-tightening oil seals ensure tightness at both ends of the crankshaft. When repairing the engine, it is recommended to replace both crankshaft oil seals regardless of their condition.
Thrust half rings
Just like with liners, no adjustment operations can be performed on half rings. In case of scoring and delamination, half rings are replaced with new ones. Half rings are also replaced if the axial clearance of the crankshaft exceeds the maximum permissible value of 0.35 mm. New half rings are selected with a nominal thickness or increased by 0.127 m to obtain an axial clearance of 0.06-0.26 mm.
The crankshaft axial clearance is checked using an indicator as shown in fig. 51, b.
Flywheel
The condition of the crown teeth is checked. If they are damaged, the flywheel is replaced.
The flywheel surfaces (Fig. 11) mating with the crankshaft and the driven clutch disc must not have any scratches or burrs. The permissible non-flatness is no more than 0.1 mm.
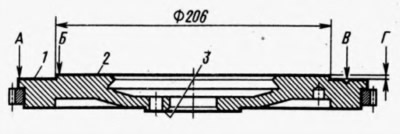
If there are scratches on the working surface of the 2 flywheels under the driven clutch disc, grind this surface, removing a metal layer of no more than 1 mm and ensuring roughness. Surface 1, maintaining the size R=(0.5±0.1) mm and ensuring the parallelism of surfaces 2 and 2 relative to surface 3. The permissible non-parallelism measured at the extreme points of surfaces 2 and 2 should not exceed 0.1 mm.
The runout of the supporting surface 2 of the driven clutch disc and the plane 2 of the clutch mount are checked by installing the flywheel on a ∅ 35 mm mandrel and centering it on the mounting hole with an emphasis on plane 3. At points A and B, the indicator should not show runouts exceeding 0.1 mm.