
Disassembly
Remove the piston pin circlips from the piston, remove the pin and disconnect the connecting rod from the piston. Remove piston rings.
Connecting rod bolts are pressed into the connecting rod. Therefore, in order not to disturb the fit of the bolt in the connecting rod, it is not allowed to press out the bolts from the connecting rods when disassembling the engine and the connecting rod and piston group.
If some parts of the connecting rod and piston group are not damaged and slightly worn, then they can be used again. Therefore, when disassembling, mark them in order to assemble a group with the same parts in the future and install them in the same engine cylinder.
Assembly
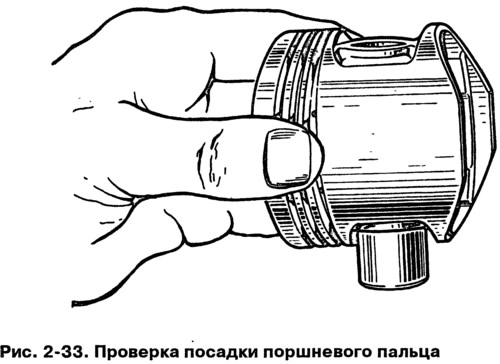
Before assembling, pick up a finger to the piston and connecting rod. For new parts, the class of the pin holes in the connecting rod and piston must be identical to the class of the pin. For used parts, for proper mating, it is necessary that the piston pin, lubricated with engine oil, enter the piston or connecting rod bore by simply pressing the thumb (pic. 2-32) and did not fall out of it if you hold the piston, as shown in fig. 2-33.
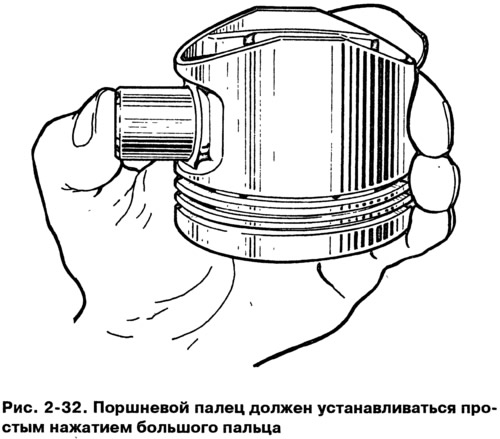
Replace the drop-down finger with another one of the next category. If a category 3 pin was inserted into the piston, replace the piston, pin and connecting rod.
The assembly of the connecting rod and piston group is carried out in the reverse order of disassembly. After installing the piston pin, lubricate it with engine oil through the holes in the piston bosses. Install piston rings in the following order.
Lubricate the piston grooves and piston rings with engine oil. Orient the piston rings so that the top compression ring lock is at a 45°angle to the piston pin axis, the lower compression ring lock is approximately 180°to the top compression ring lock axis, and the oil scraper ring lock is approximately 90°to the lock axis top compression ring.
Install the lower compression ring with the groove down (rice. 2-30). If the ring is marked «Top» or «TOR», then install the ring with the mark up (to the bottom of the piston).
Before installing the oil scraper ring, check that the joint of the spring expander is located on the side opposite to the ring lock.